Core
Core Link
LinkExplore Partner Center
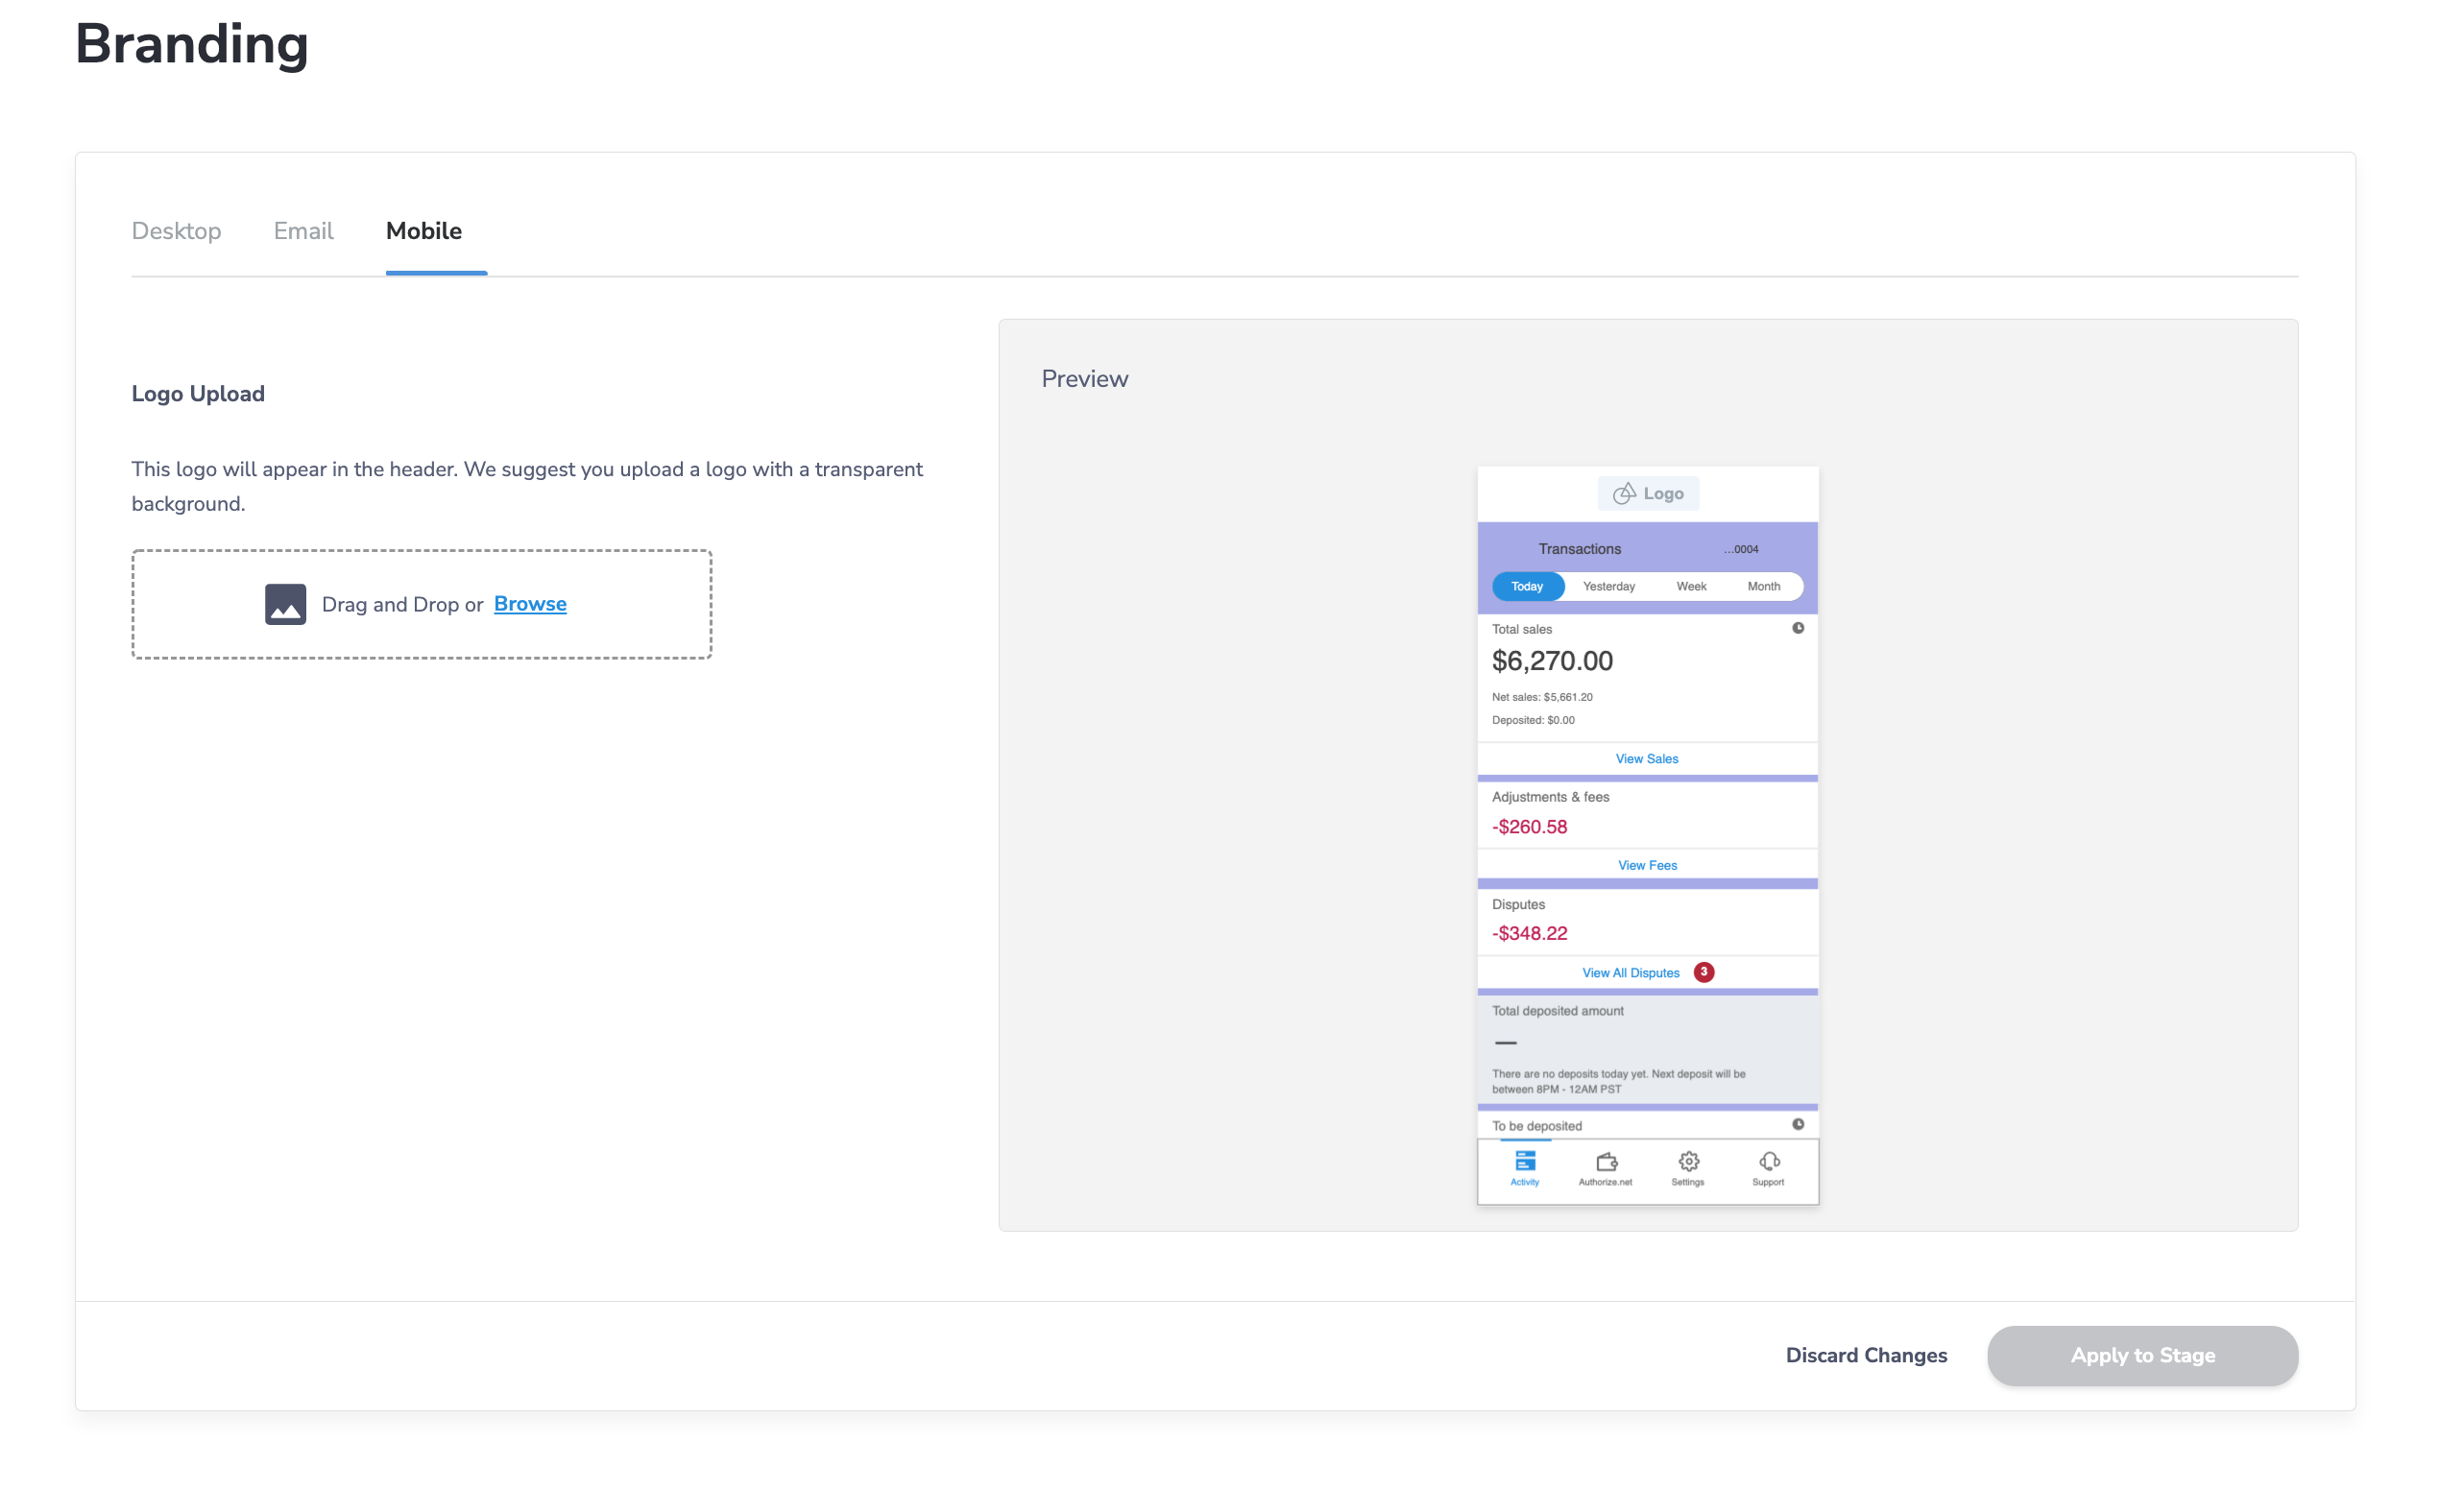
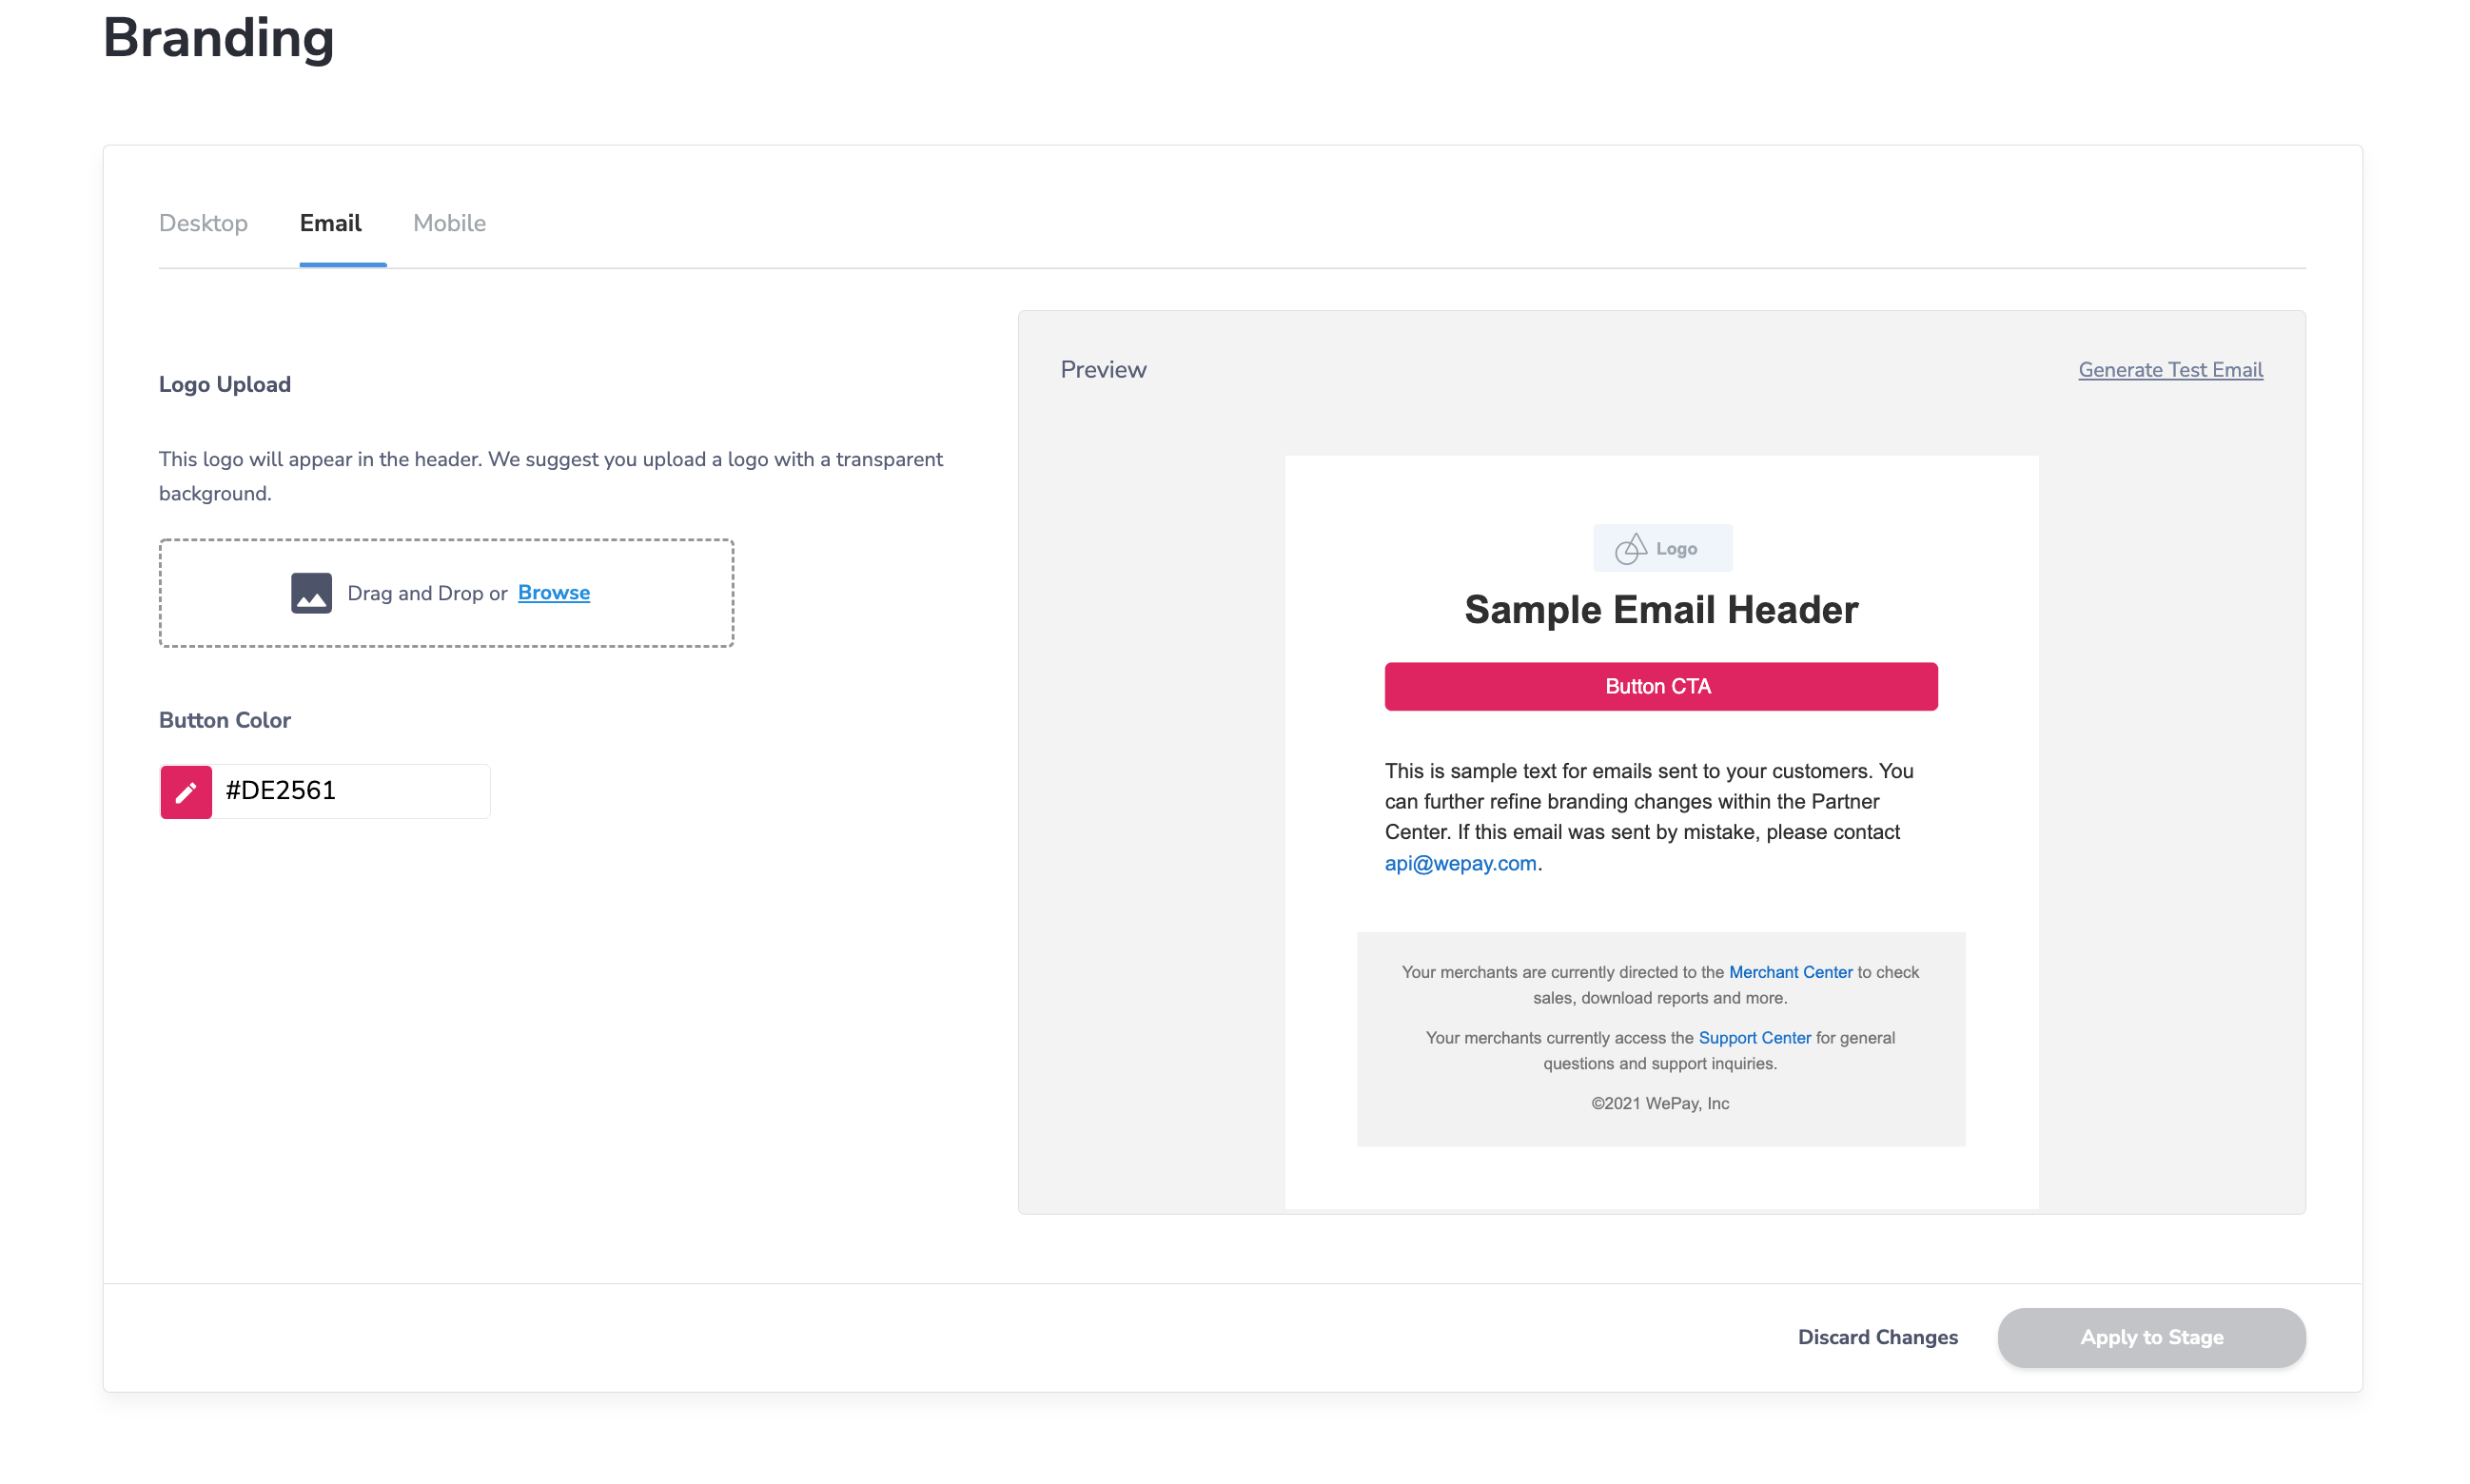
Branding
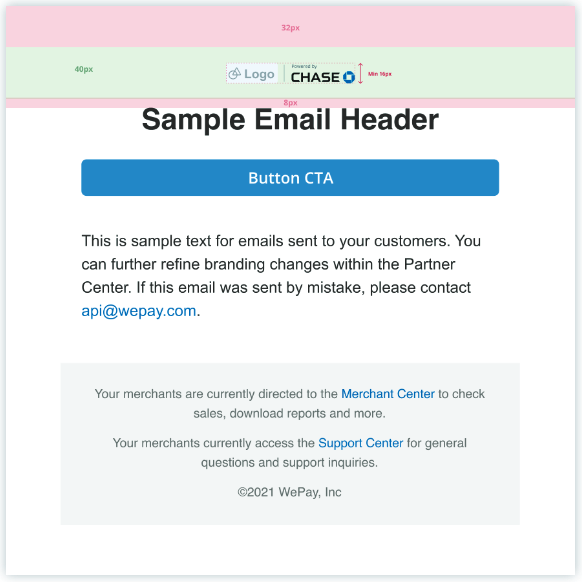
Work with your WePay integration team, technical account manager, or API support to get access to the branding tab in Partner Center. From here, you can modify the color scheme and logo on the WePay Merchant Center (desktop and mobile) and WePay-owned emails.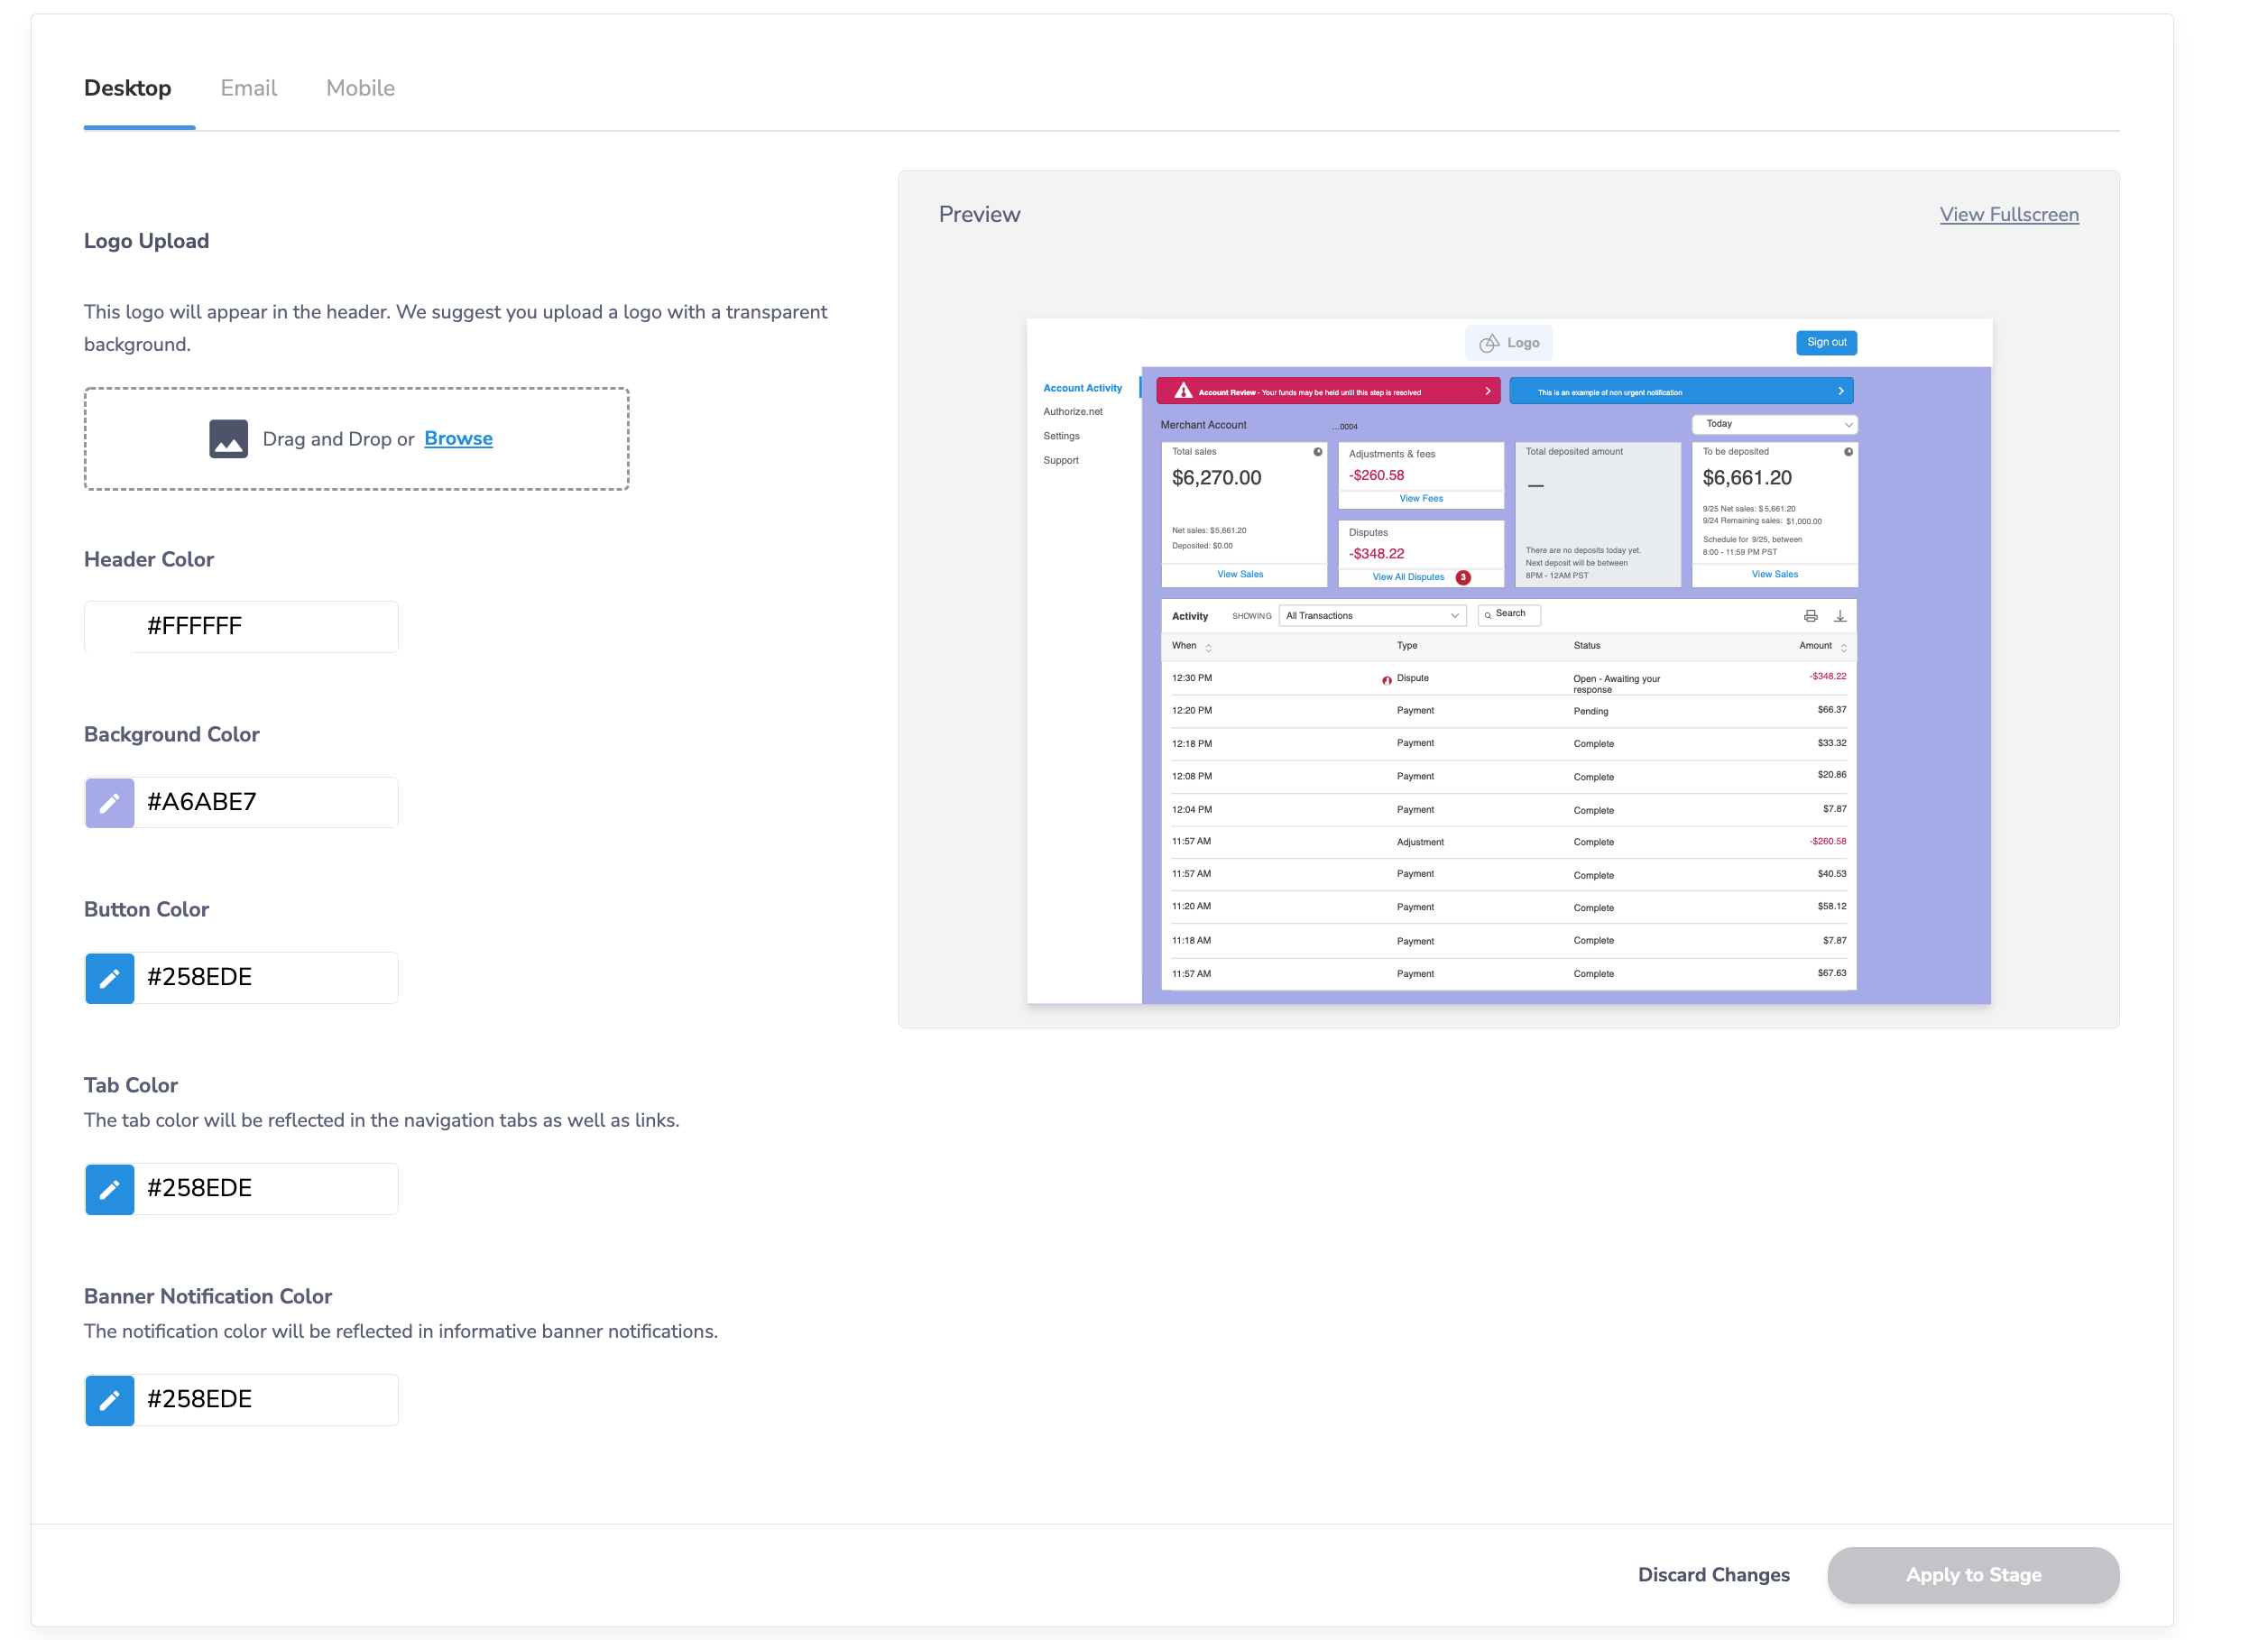
Co-Branding
Work with your WePay integration team, technical account manager, or API support to get approved for co-branding with powered by Chase.Logo lockups
The size of the Octagon determines the size of clear space surrounding the logo. Using vertical or horizontal lockup is determined by location of where the logo will be used. Size of lockup is also determined by where the logo will be applied.
Horizontal lockup

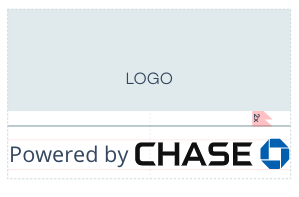
Desktop: min height 16 pixels
Add Team Members and Roles
Partner Center Admins can grant and restrict access to various Partner Center features by creating user-defined roles. Group together feature privileges within a specific role and assign those roles within your platform's operations and organization.Invite a Team Member
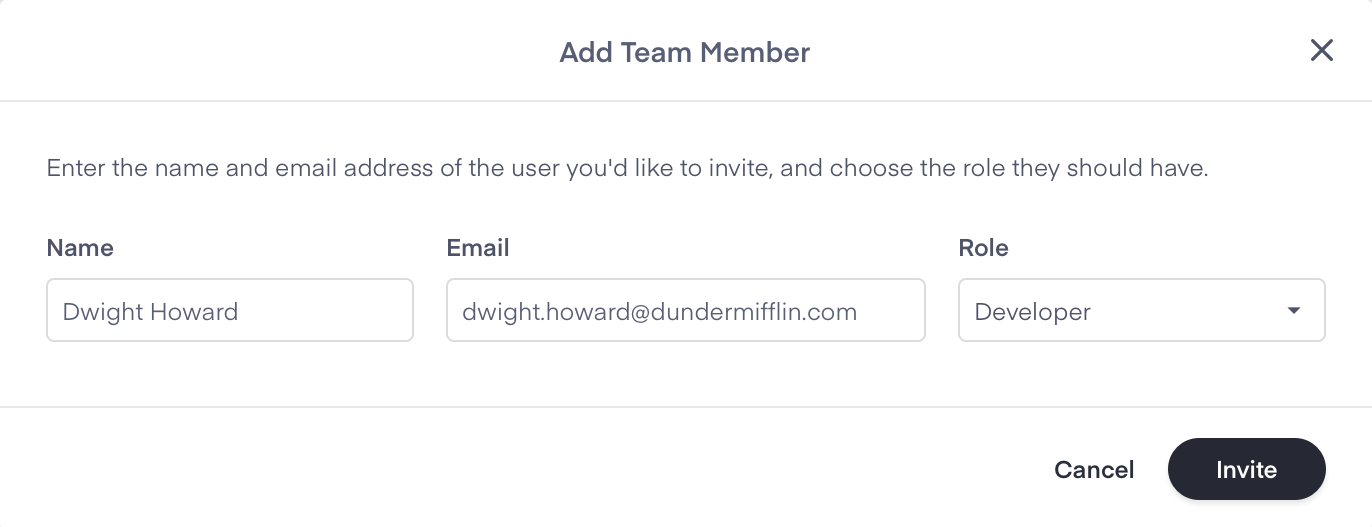
Navigate to the Team Members & Roles tab and select the+ Invite Members button on the top right of the dashboard to invite additional users.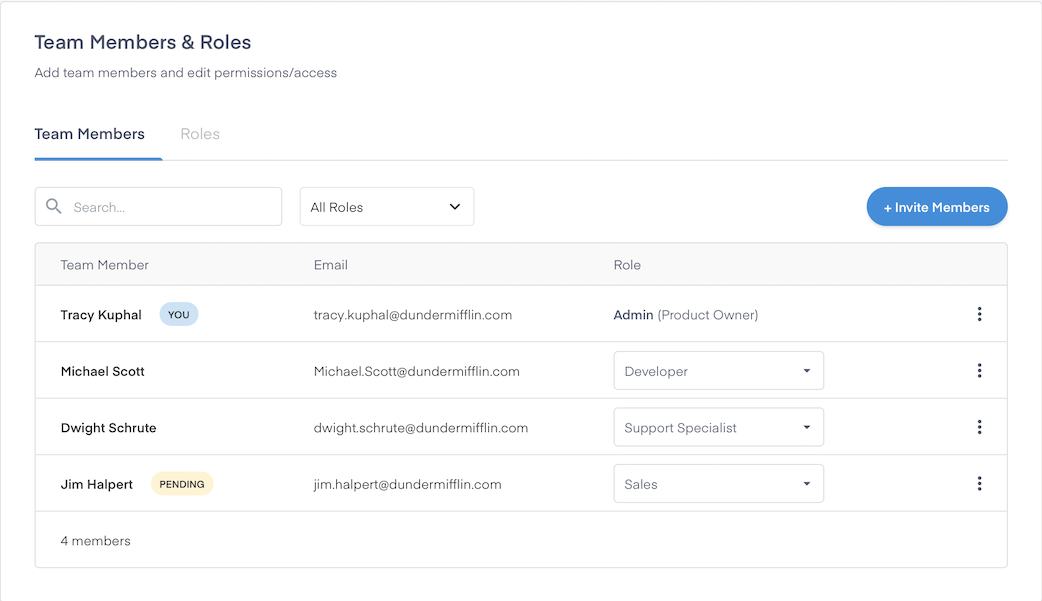
Create a New Role
Within the Team Members & Roles feature, users can navigate to the Roles tab to view, edit and create user-defined roles. Users can select+ Create Role to create a new role or edit an existing role by selecting “Edit Role” within a defined role's menu.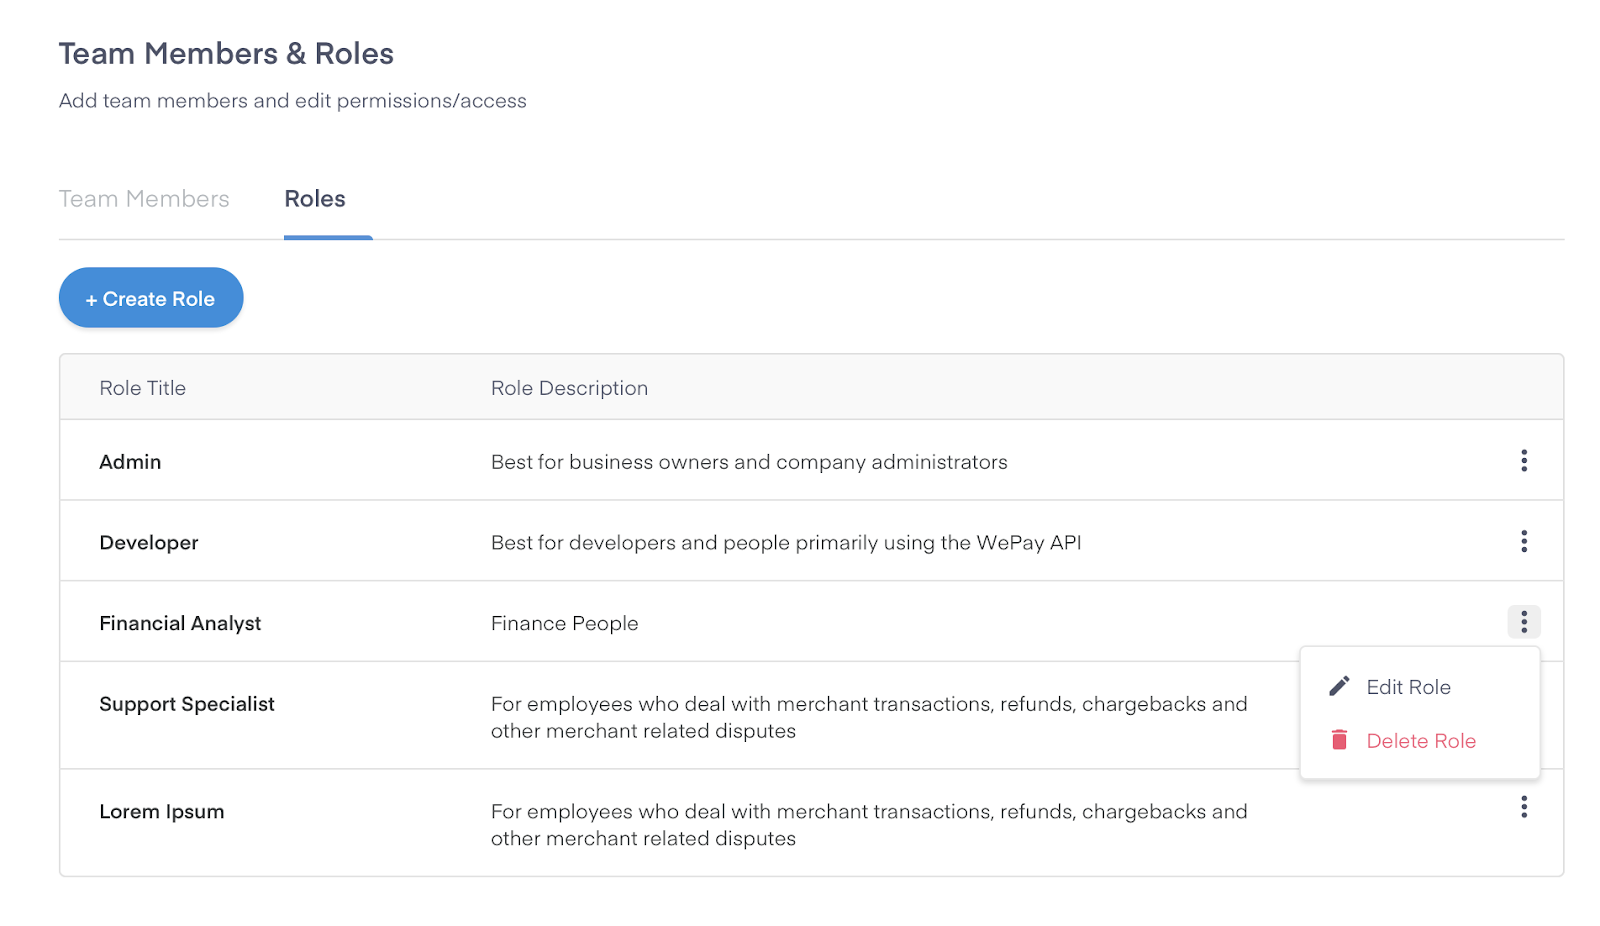
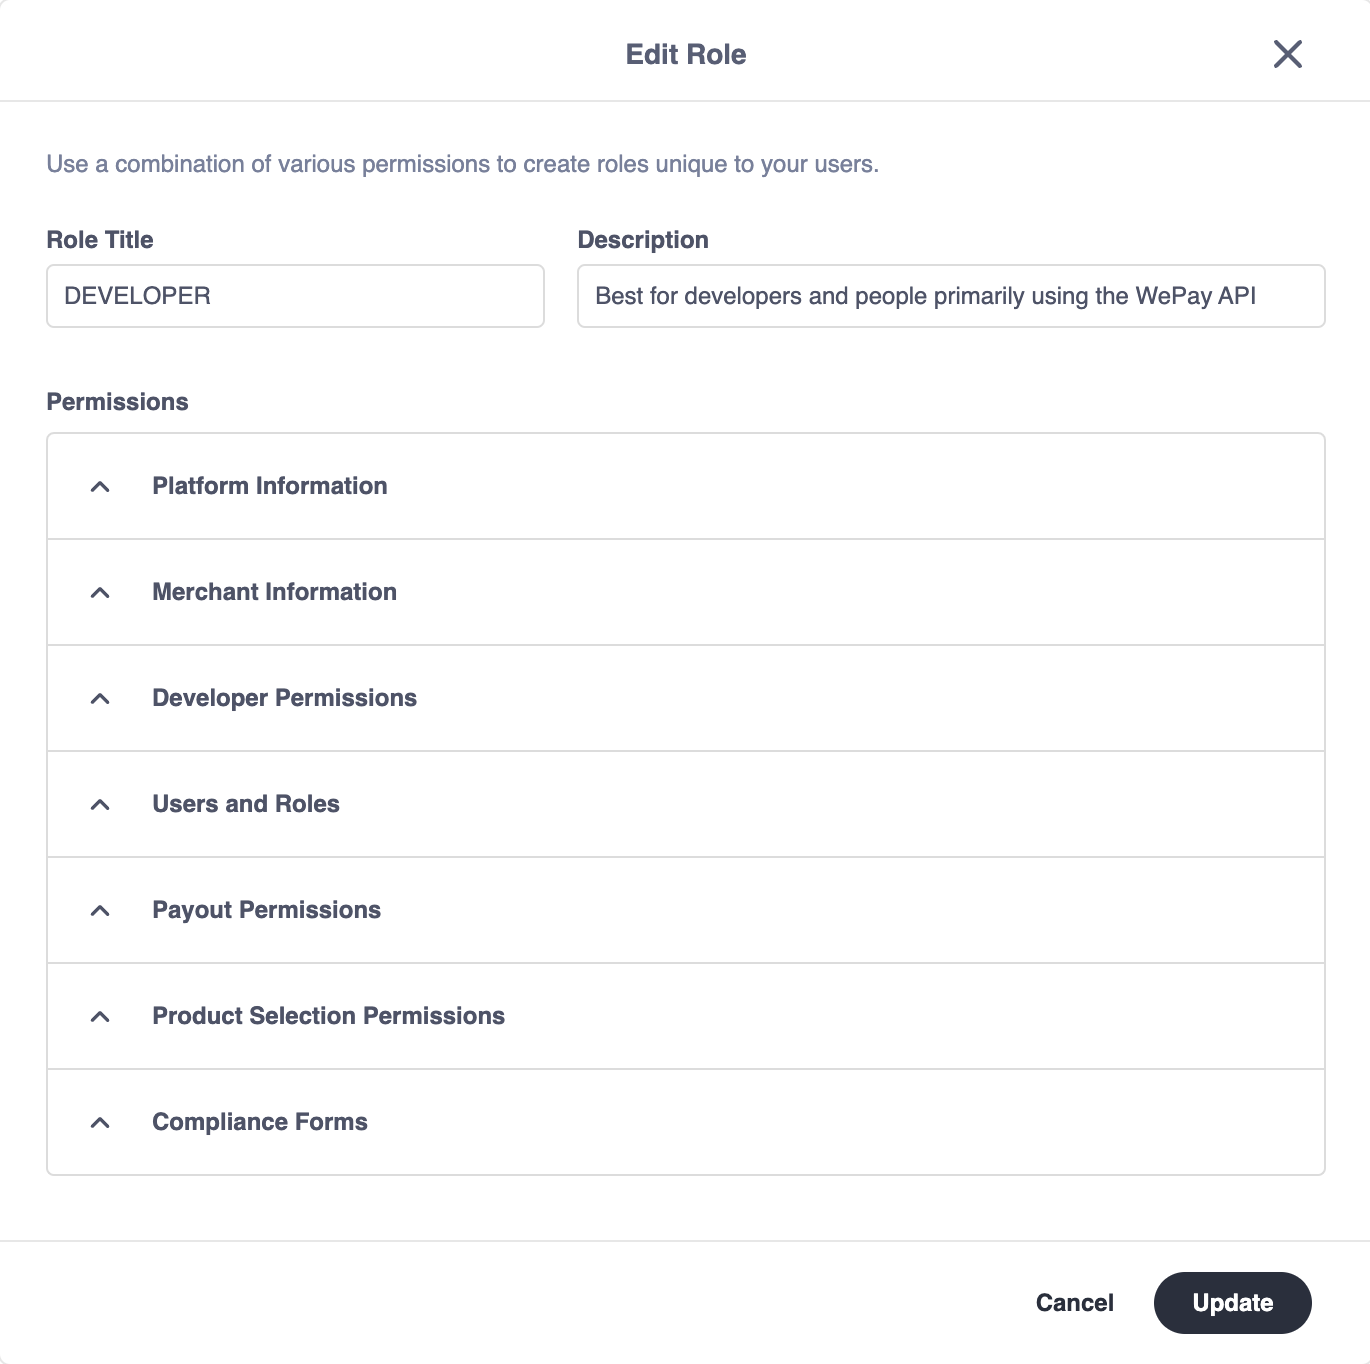
Permissions
Platform Information:
- Financial Dashboard Access: View the Financial Dashboard
- Differentiate stage and production permissions for team members who want to investigate the capabilities of the financial dashboard versus team members who should actually have access to real financial information.
- Reporting Dashboard Access: View and download transactions and Merchant account reports
Merchant Information:
- Merchant Dashboard Access: View and lookup merchants on the your platform
- Differentiate stage and production permissions for team members who want to investigate the capabilities and particulars of the merchant dashboard versus team members who should actually have access to real merchant information.
Developer Permissions:
- Tokens Access: View (read) and create (write) App Tokens
- Differentiate stage and production permissions for team members who need to view/create stage app tokens versus team members who need to view/create production app tokens.
- API Log Access: View and filter API logs
- Separate stage and production permissions for team members who need to access stage API logs versus team members who need to access production API logs.
Users and Roles Permissions:
- Role Access: View and create roles unique to your organization
- User Access: Invite users and assign roles to your organization's instance of Partner Center
Payout Permissions:
- Payout Bank Information: View and update your platform's bank account details
- Product Selection: Switch your stage app between Link and Clear product selection
Integration Permissions:
- Merchant SSO Access
- Separate stage and production permissions for team members who need to investigate the capabilities and particulars of merchant SSO versus team members who need production access to your merchant SSO settings.
- Merchant Branding Access: View and apply branding to Merchant Center (Desktop/Mobile) and Emails
- Separate stage and production permissions for team members who need to test out different branding options versus team members who need to roll out new branding options.
Access Security Settings
The Partner Center requires email verification, secure passwords, and Multi-factor Authentication (MFA). Within Account Preferences, users can change their email address, password, and MFA. Users are prompted to verify the relevant field when electing to edit the existing account information.MFA
The Partner Center supports 2 types of MFA: SMS-based MFA and authenticator-based MFA. Users can modify their MFA via Account Preferences or Settings.SMS-based MFA:
SMS-based MFA is limited to the +1 country code. Only users with US or Canada phone numbers can leverage SMS-based MFA.Authenticator-based MFA:
The authenticator-based MFA solution can be leveraged by all Partner Center users. It requires a 3rd party app, such as Google Authenticator or Duo, to provide the token. Authenticator leverages the Time-based One-time Password (TOTP) Algorithm to generate a unique token for the user. Authenticator-based MFA is more secure than SMS-based MFA.App Tokens
The new Partner Center allows users to create up to 3 tokens in each environment. KYC verification is required to receive production tokens in the new Partner Center. Partners can access the KYC verification flow from the banner notification or on the Live tab of the app tokens feature.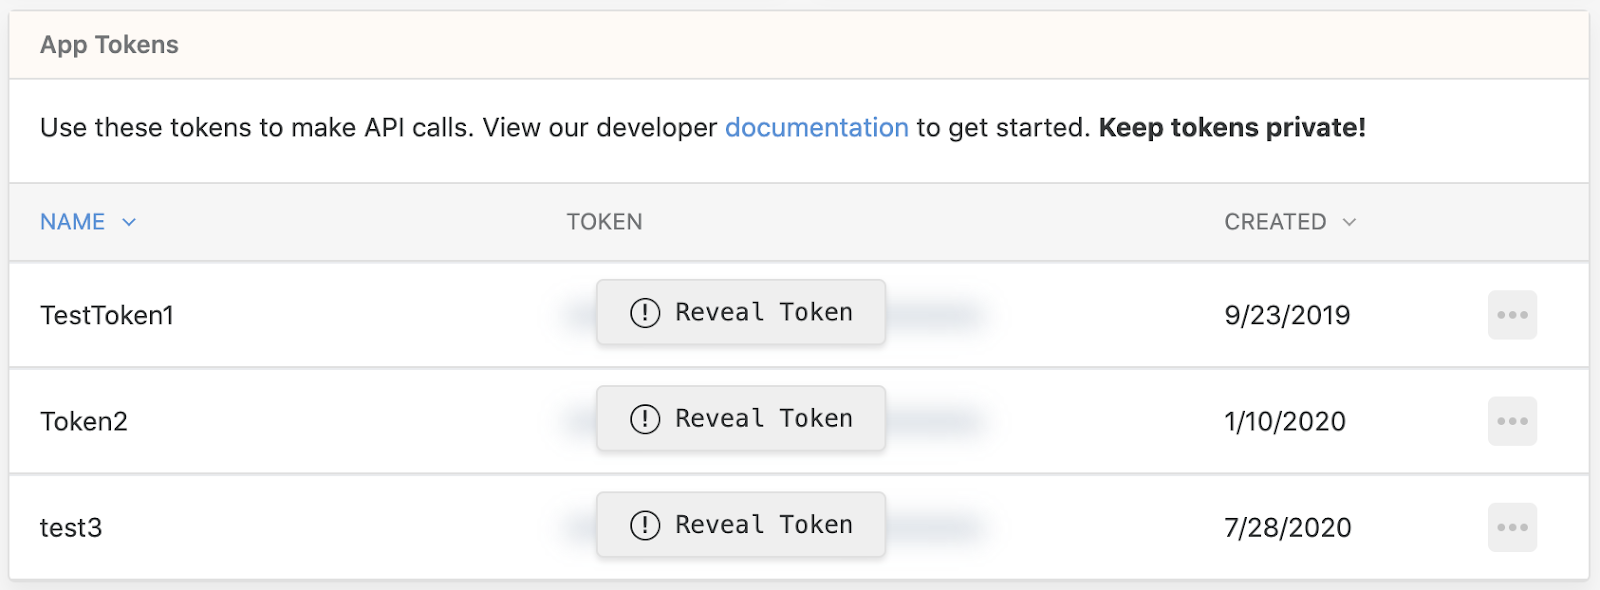
Financial Reporting
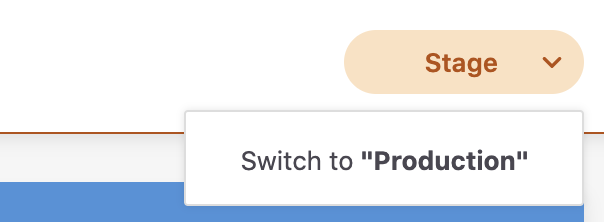
The Partner Center gives you access to financial reporting for your platform, making it easy to keep track of billing statements, transactions, accounts, and merchant reports with the ability to instantly export merchant reports to provide to your finance team. This involves parsing reports from raw data into a .csv file.Here is a snapshot of the type of financial reporting the Partner Center covers, available in both the stage and production environments. Switch between the stage and production environments in the Partner Center by clicking the "Switch" button highlighted in the top right-hand corner of the portal:
Note
Switching between environments is a global function and effects App Tokens, API Logs, Merchant Profile, Reporting, and Financial Dashboard.
Payouts
Under the "Reporting" tab, view and reconcile all your app's payouts in the "Payouts" section.
Transactions
Under the "Reporting" tab in the "Transactions" section, you'll have the ability to track the type, status of record, gross amount, amount, fees, charged amount, date, and account ID of the transactions processed on your app.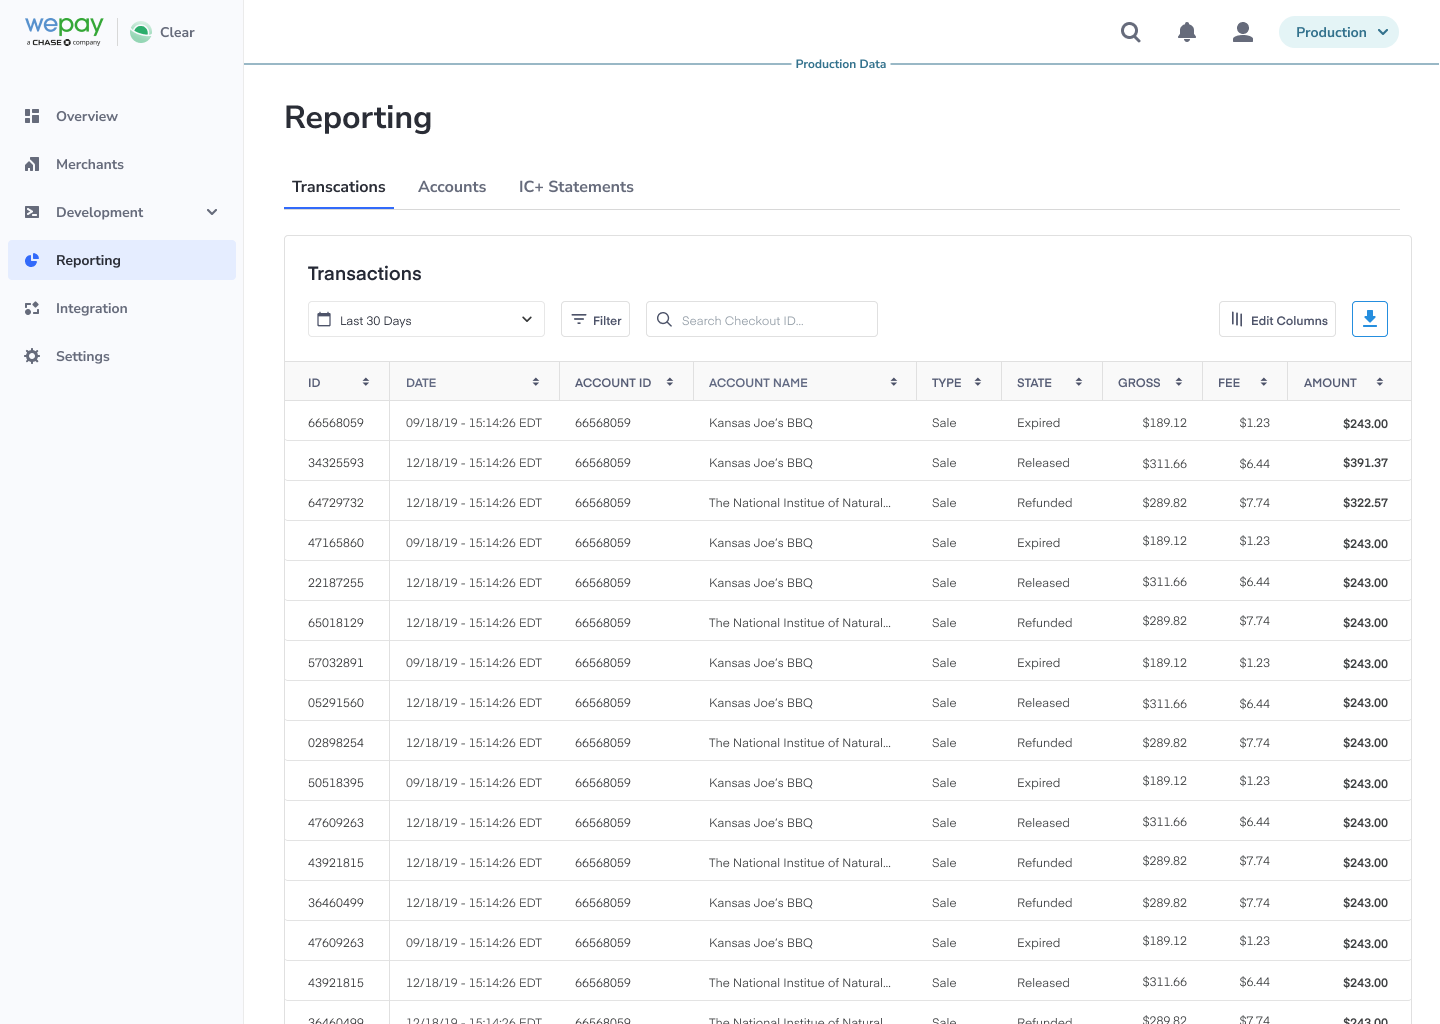
Transaction Statuses
See below for various transaction status descriptions.| Sales | |
|---|---|
PENDING | Sale is pending |
PENDING - AUTHORIZED | Sale has been authorized, but not completed |
PENDING - IN REVIEW | Sale is under review by the Risk Team |
PENDING - NEW | Sale object has been newly created, and is in a pending state |
COMPLETED - RESERVED | Sale has been completed, but funds are held in reserve |
COMPLETED | Sale has been completed |
DISPUTED | Sale has been disputed |
FAILED | Sale has failed |
CANCELED | Sale has been canceled |
| Payouts | |
|---|---|
PENDING | Payout is pending |
PENDING - NEW | Payout has been newly created, and is in a pending state |
COMPLETED | Payout has been completed |
FAILED | Payout has failed or been canceled |
| Refunds | |
|---|---|
PENDING - NEW | Refund object has been newly created, and is in a pending state |
PENDING - AUTHORIZED | Refund has been authorized, but not completed |
PENDING - IN REVIEW | Refund is under review by the Risk Team |
PENDING | Refund is pending |
COMPLETED | Refund has been completed |
FAILED | Refund has failed or been canceled |
| Dispute/Chargeback | |
|---|---|
AWAITING MERCHANT RESPONSE | Merchant has not yet responded |
AWAITING CHARGEBACK DECISION | This chargeback has entered representment and is awaiting a decision from the issuing bank |
REPRESENT WITH CREDIT | A conditional credit has been given to the merchant awaiting the chargeback decision |
REPRESENT WITHOUT CREDIT | A conditional credit is not given to the merchant awaiting the chargeback decision |
RESOLVED | Dispute/chargeback has been resolved |
EXPIRED | Merchant did not respond prior to due date and can no longer be contested |
| Adjustment | |
|---|---|
PENDING - NEW | Adjustment object has been newly created, and is in a pending state |
PENDING - AUTHORIZED | Adjustment has been authorized, but not completed |
PENDING - IN REVIEW | Adjustment is under review by the Risk Team |
COMPLETED - RESERVED | Adjustment is completed, but funds are being held in reserve |
COMPLETED | Adjustment has been completed |
REFUNDED | Adjustment has been refunded |
DISPUTED | Adjustment has been disputed |
FAILED | Adjustment has failed |
| Recovery Attempt | |
|---|---|
PENDING - NEW | Recovery attempt has been newly created, and is in a pending state |
PENDING - AUTHORIZED | Recovery attempt has been authorized, but not completed |
PENDING | Recovery attempt is pending |
COMPLETED | Recovery attempt has been completed |
REFUNDED | Recovery attempt has been refunded |
DISPUTED | Recovery attempt has been disputed |
FAILED | Recovery attempt has been failed or canceled |
Reporting Filters
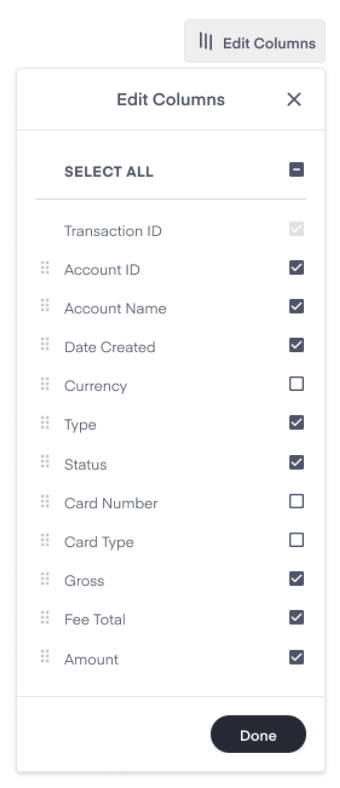
Filter through pages of transactions and payouts by using the filter, search, or date range options.Edit Columns
Use the edit column button to control the content of your transactions records.
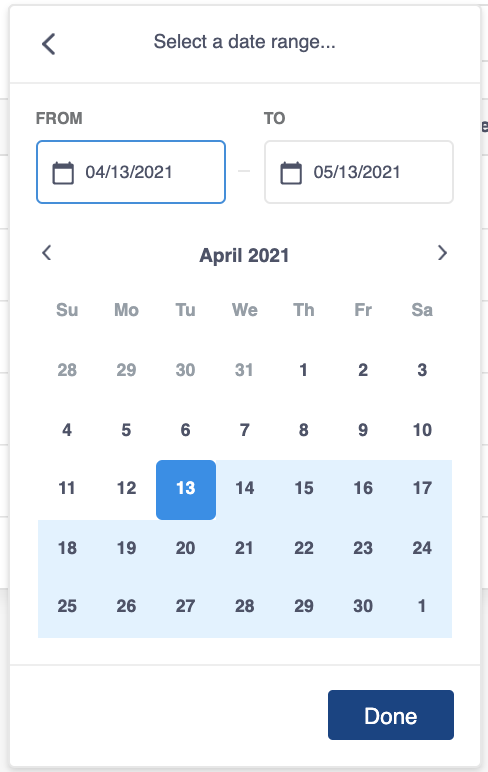
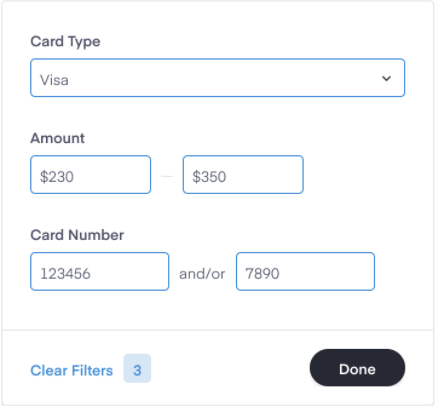
Filter by Date Range or Card Type
Use the filters for Date Range and Card Type to filter through transaction records and pinpoint records precisely. Using the Card filter allows you to search transaction records using the last four digits of the cardholders card.
Search Transactions
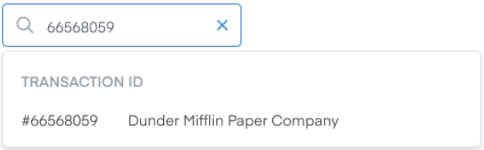
Under the "Reporting" tab, use the search bar to search transaction records by the transaction ID.
Note
Data will only be stored in Partner Center for two years. If you would like to access the data for longer than two years, you should plan to export it.
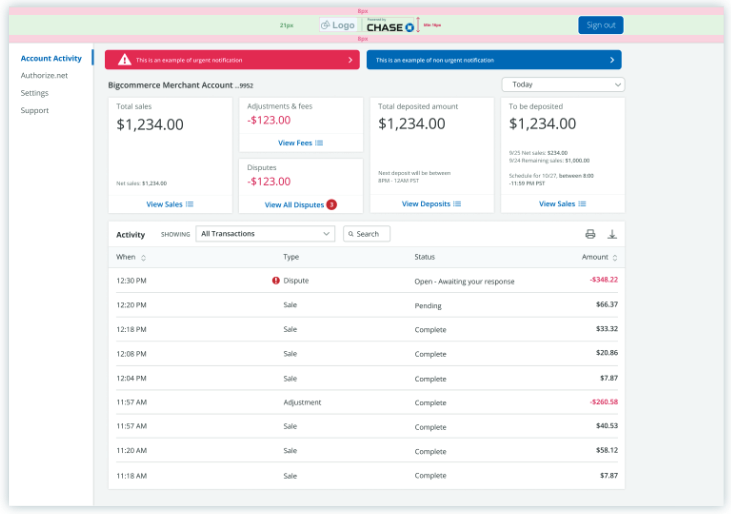
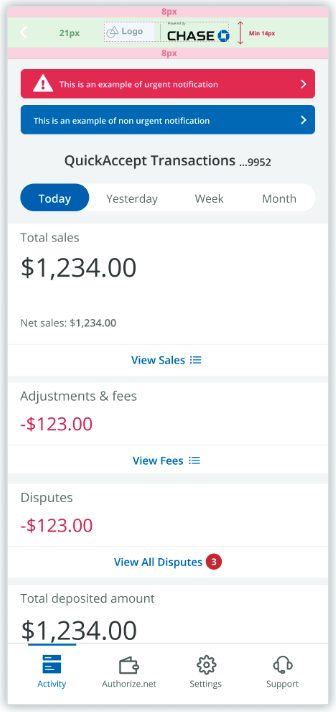
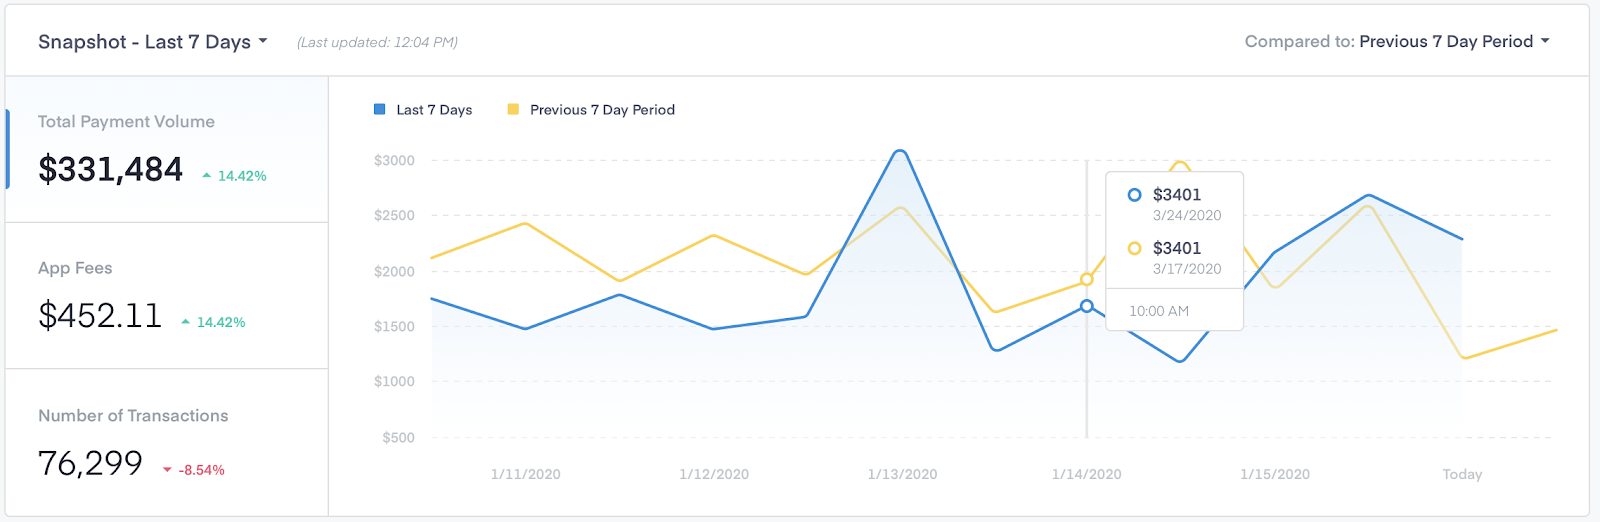
Financial Dashboard
Use the financial dashboard to oversee transactions processing through your platform. The dashboard provides an overview of total payment volume compared to prior time periods. The default time period is 1 week, with the option to customize the period from 1 day to 2 years and anywhere in between.- Total Payment Volume: The gross of all sales minus the gross of all refunds over the selected time period.
- App Fees: The portion of transactions collected by your application over the selected time period.
- Number of Transactions: Total number of transactions occurring on the partner's platform over the selected time period.
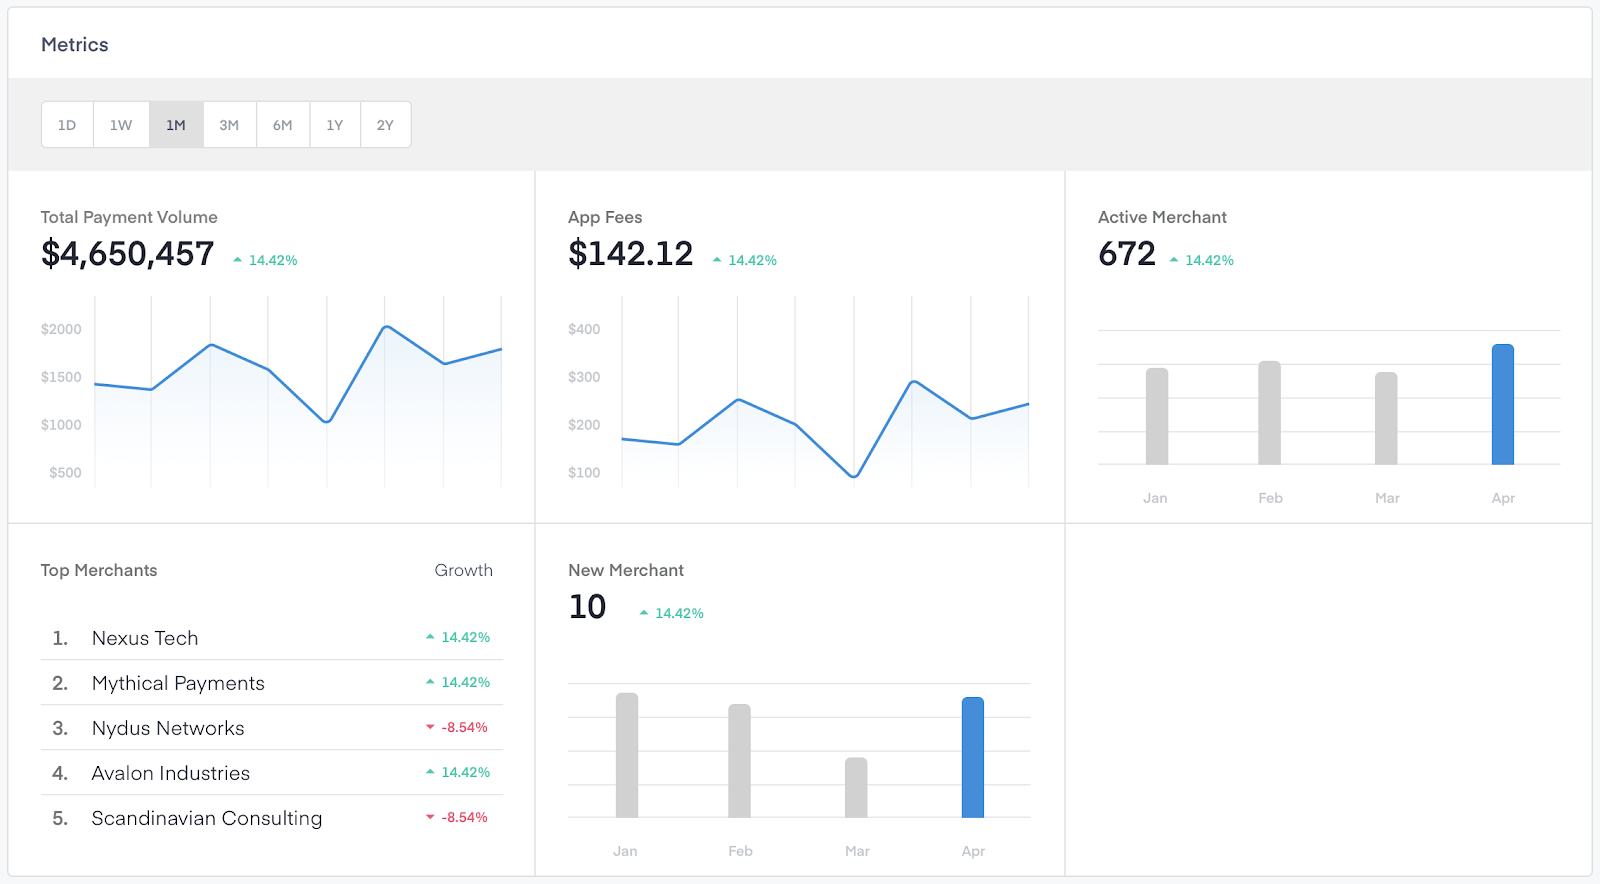
Metrics
Open the financial dashboard to see the metrics pane view that displays high level metrics related to your platform. The image below measures:- Total Payment Volume: The gross of all sales minus the gross of all refunds over the selected time period.
- App fees: The portion of transactions collected by your application over the selected time period.
- Active Merchants: The number of merchants that are verified with a total payment volume greater than $0.00 within the selected time period.
- Top Merchants: The top 5 merchants based on total payment volume over the selected time period.
- New Merchants: The number of new merchants that signed up to use the partner's platform. New merchants may be unverified or verified.
Upgraded API Key Conversion
Once you upgrade to the new Partner Center experience, your original API Keys will remain active. Continue using those (or generate new API Keys as desired) and continue calling WePay's V2 endpoints while you explore and plan your API upgrade to Link or Clear.Coming from the legacy partner center experience, you'll be used to having a set of API Keys like this:


| Legacy partner center API Key | Upgraded partner center API Key |
|---|---|
| Client ID | App ID |
| Client Secret | App Token |
| Access Token | N/A |
client_id, access_token, and client_secret will look like this with legacy API Keys:curl -L -X POST 'https://stage.wepayapi.com/v2/user/register' \
-H 'Content-Type: application/json' \
-H 'Authorization: BEARER {ACCESS-TOKEN}' \
--data-raw '{
"client_id": {CLIENT_ID},
"client_secret": "{CLIENT_SECRET}",
"email": "{user_email}",
"scope": "manage_accounts,collect_payments,view_user,send_money,preapprove_payments",
"first_name": "{user_first_name}",
"last_name": "{user_last_name}",
"original_ip": "{user_ip}",
"original_device": "Mozilla/5.0 (Macintosh; U; Intel Mac OS X 10_6_6; en-US) AppleWebKit/534.13 (KHTML, like Gecko) Chrome/9.0.597.102 Safari/534.13",
"tos_acceptance_time": {user_tos_acceptance_time}
}'curl -L -X POST 'https://stage.wepayapi.com/v2/user/register' \
-H 'Content-Type: application/json' \
--data-raw '{
"client_id": {APP-ID},
"client_secret": "{APP-TOKEN}",
"email": "{user_email}",
"scope": "manage_accounts,collect_payments,view_user,send_money,preapprove_payments",
"first_name": "{user_first_name}",
"last_name": "{user_last_name}",
"original_ip": "{user_ip}",
"original_device": "Mozilla/5.0 (Macintosh; U; Intel Mac OS X 10_6_6; en-US) AppleWebKit/534.13 (KHTML, like Gecko) Chrome/9.0.597.102 Safari/534.13",
"tos_acceptance_time": {user_tos_acceptance_time}
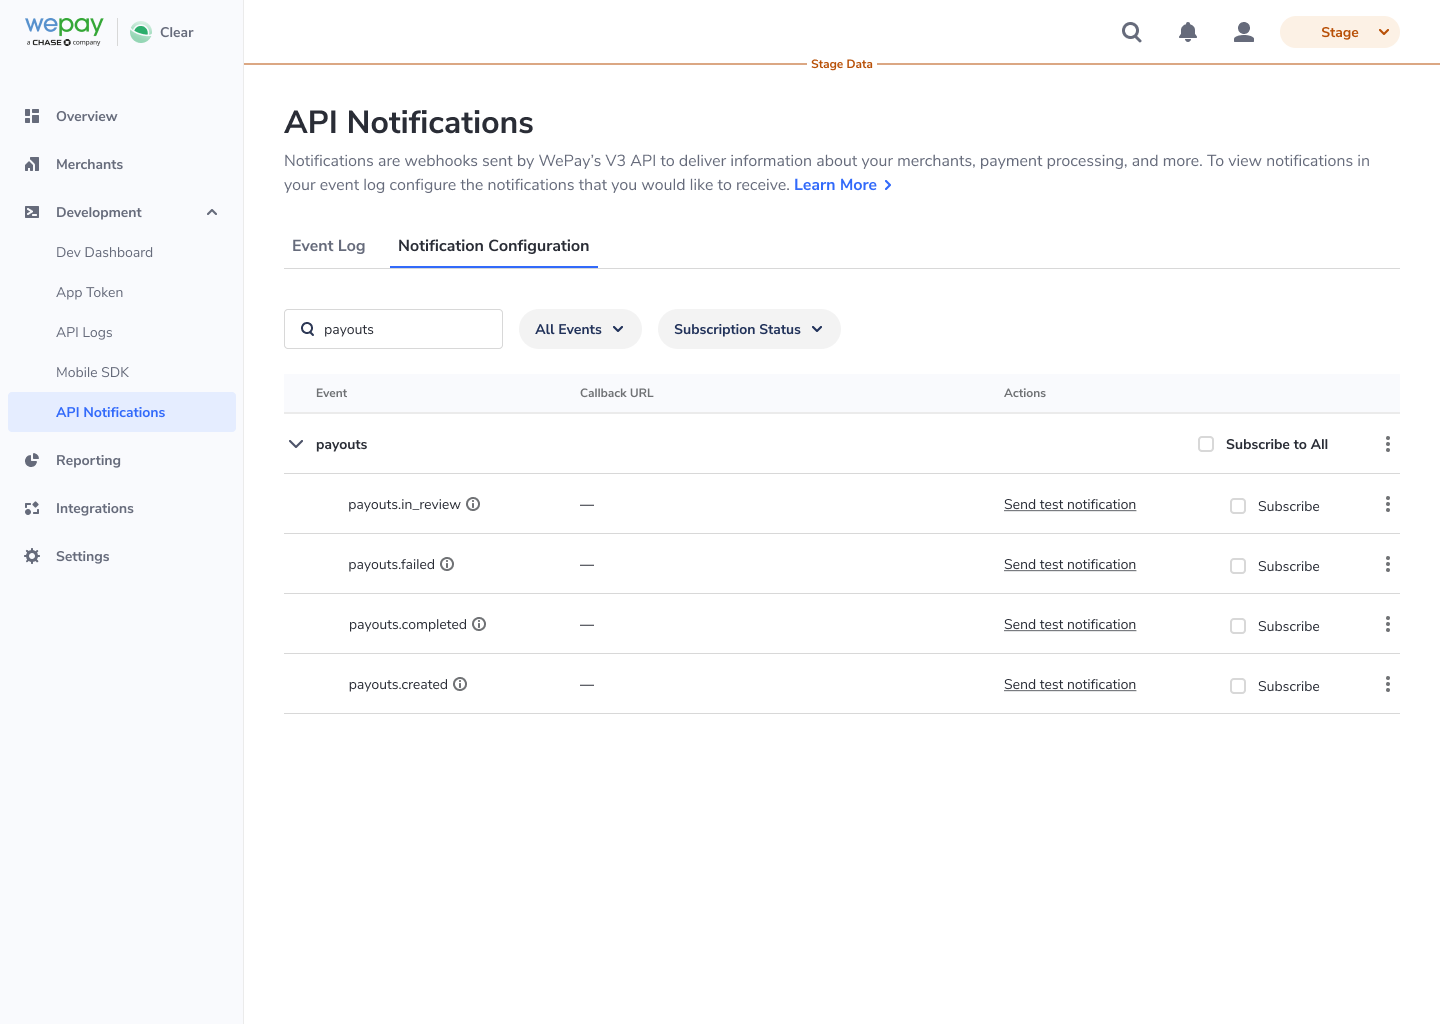
}'API Notifications
Note
The API Notifications page in Partner Center is currently a Beta feature.
- Prior to the notification preferences being configured, the Event Log where users can view all of their notifications coming in will be empty.
- A Partner Center user with "Read/Write" access to the API Notifications page will have to click on the "Notification Configuration" tab to be able to configure the notification preferences.
- Once notification preferences are selected the "Events Log" table will begin to populate with notifications.
How do users with Read/Write access configure the notification preferences?
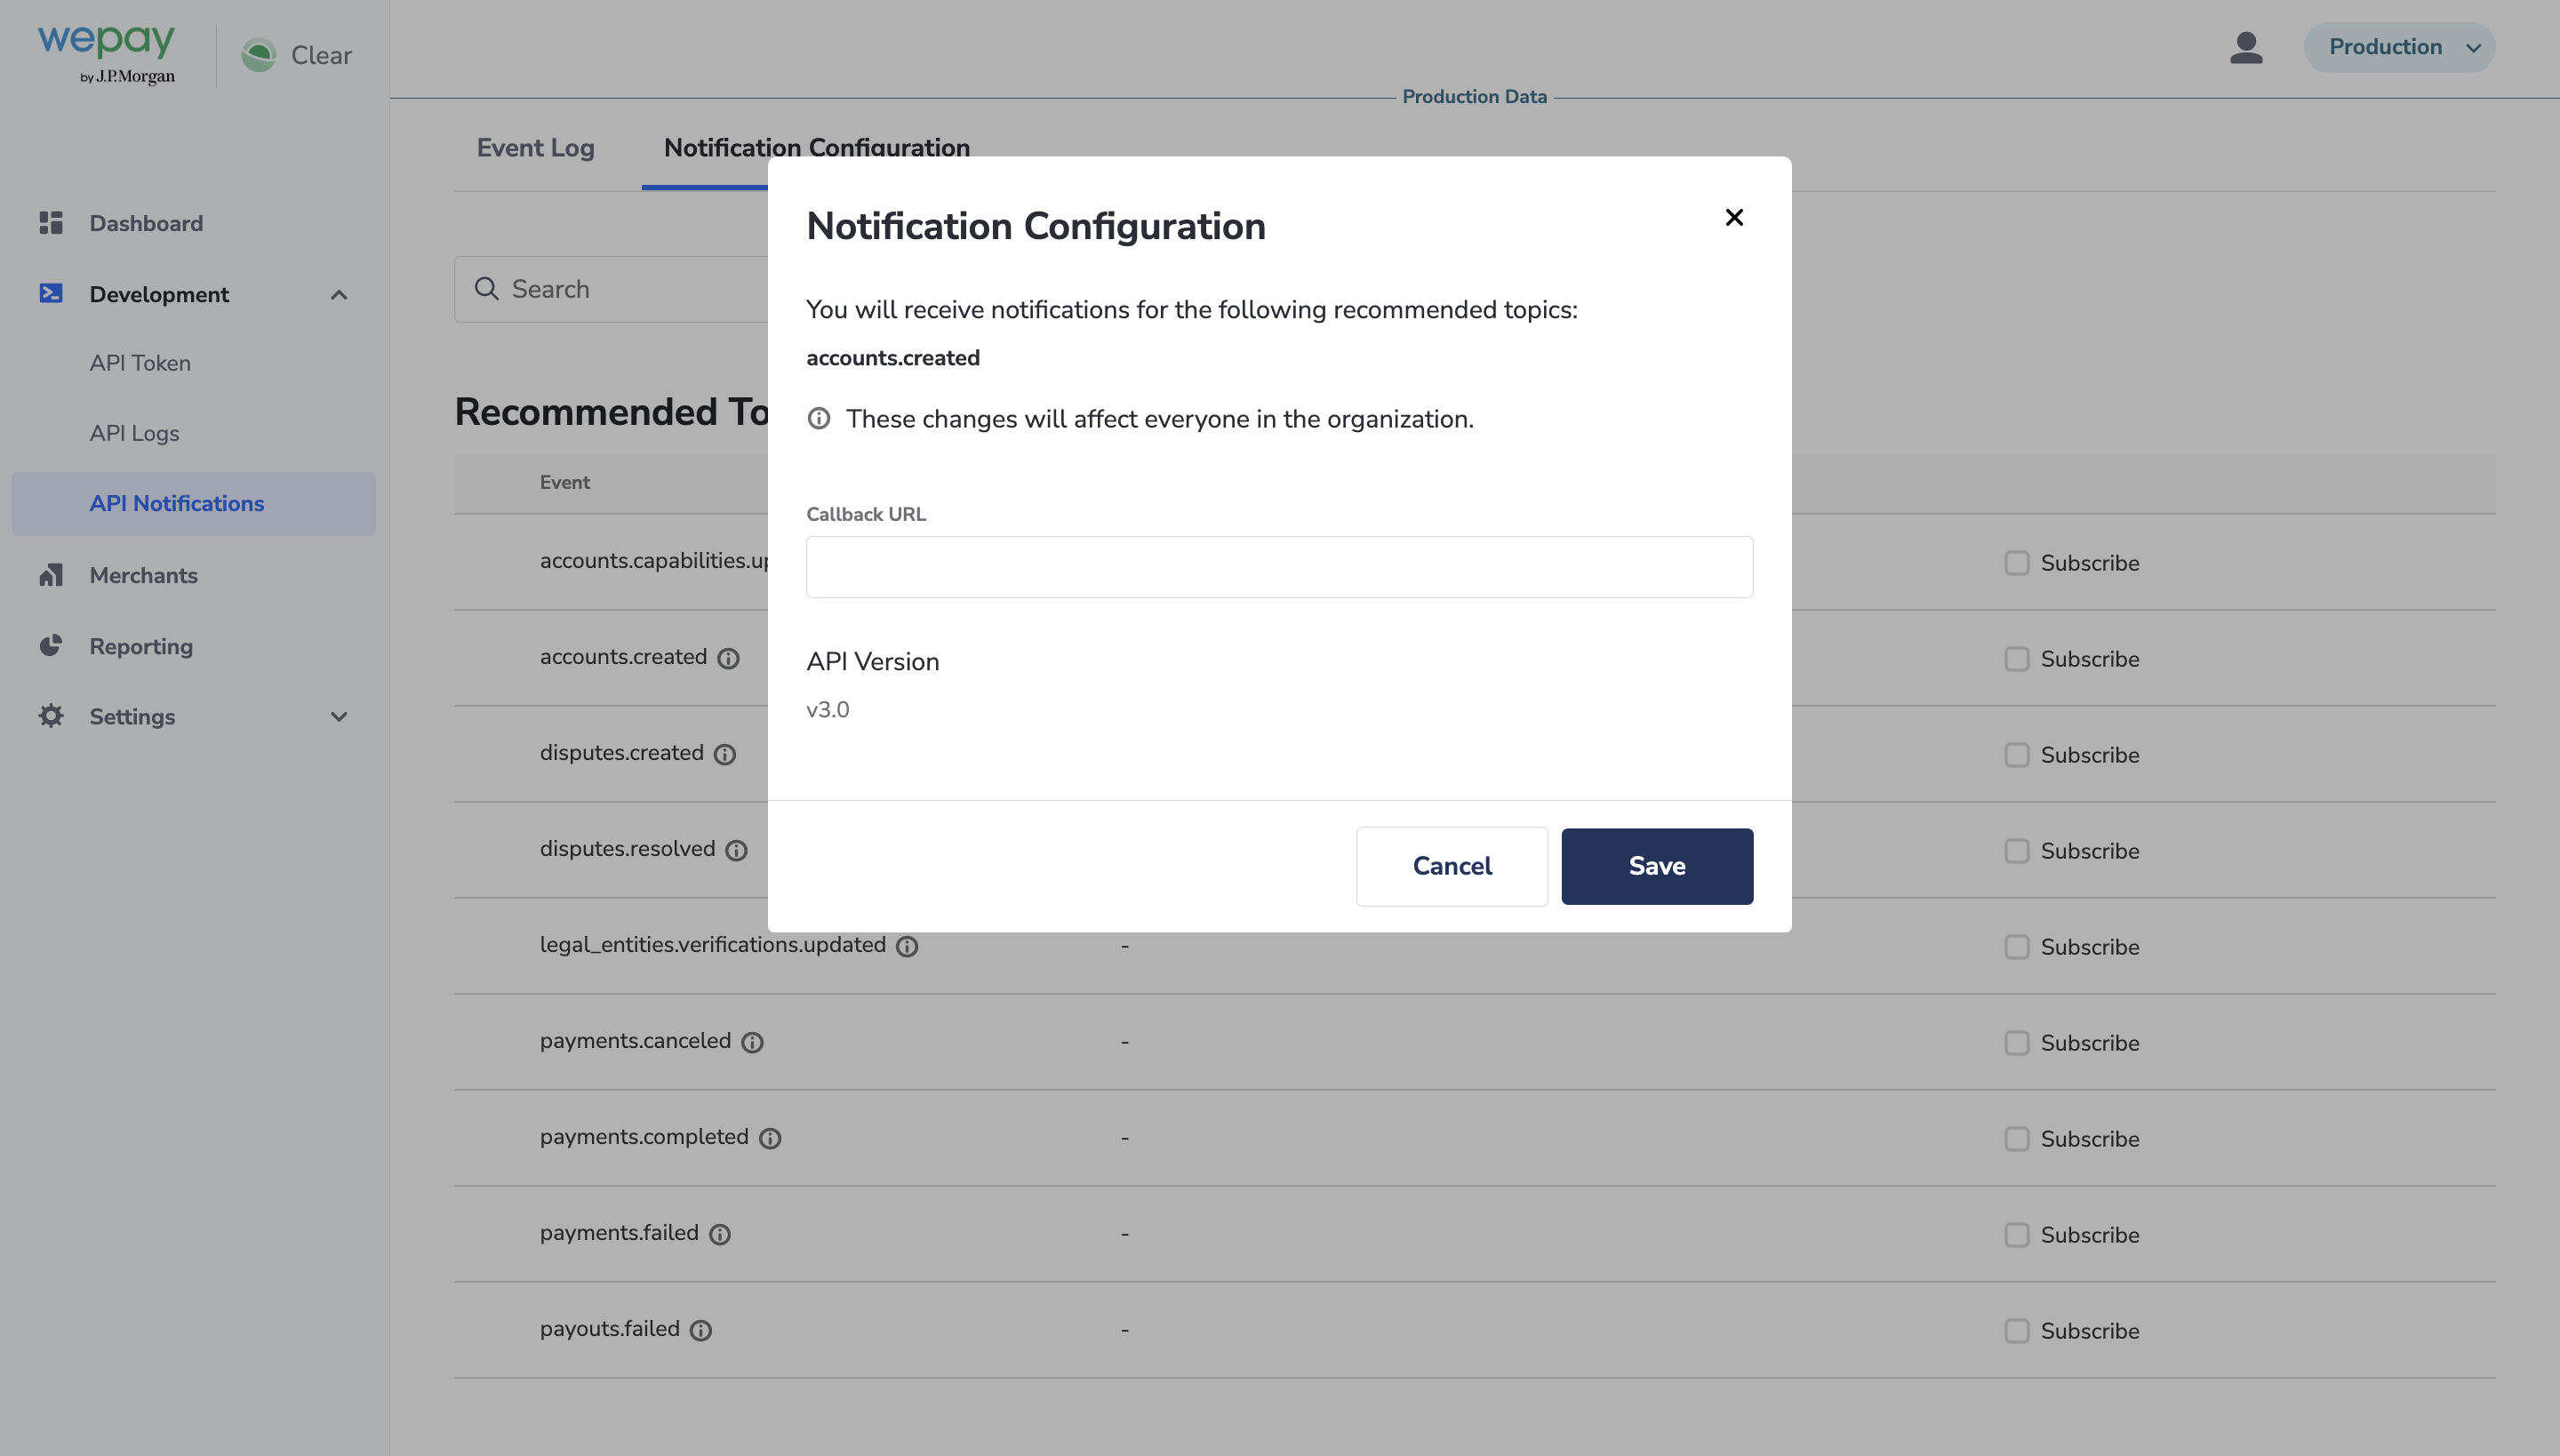
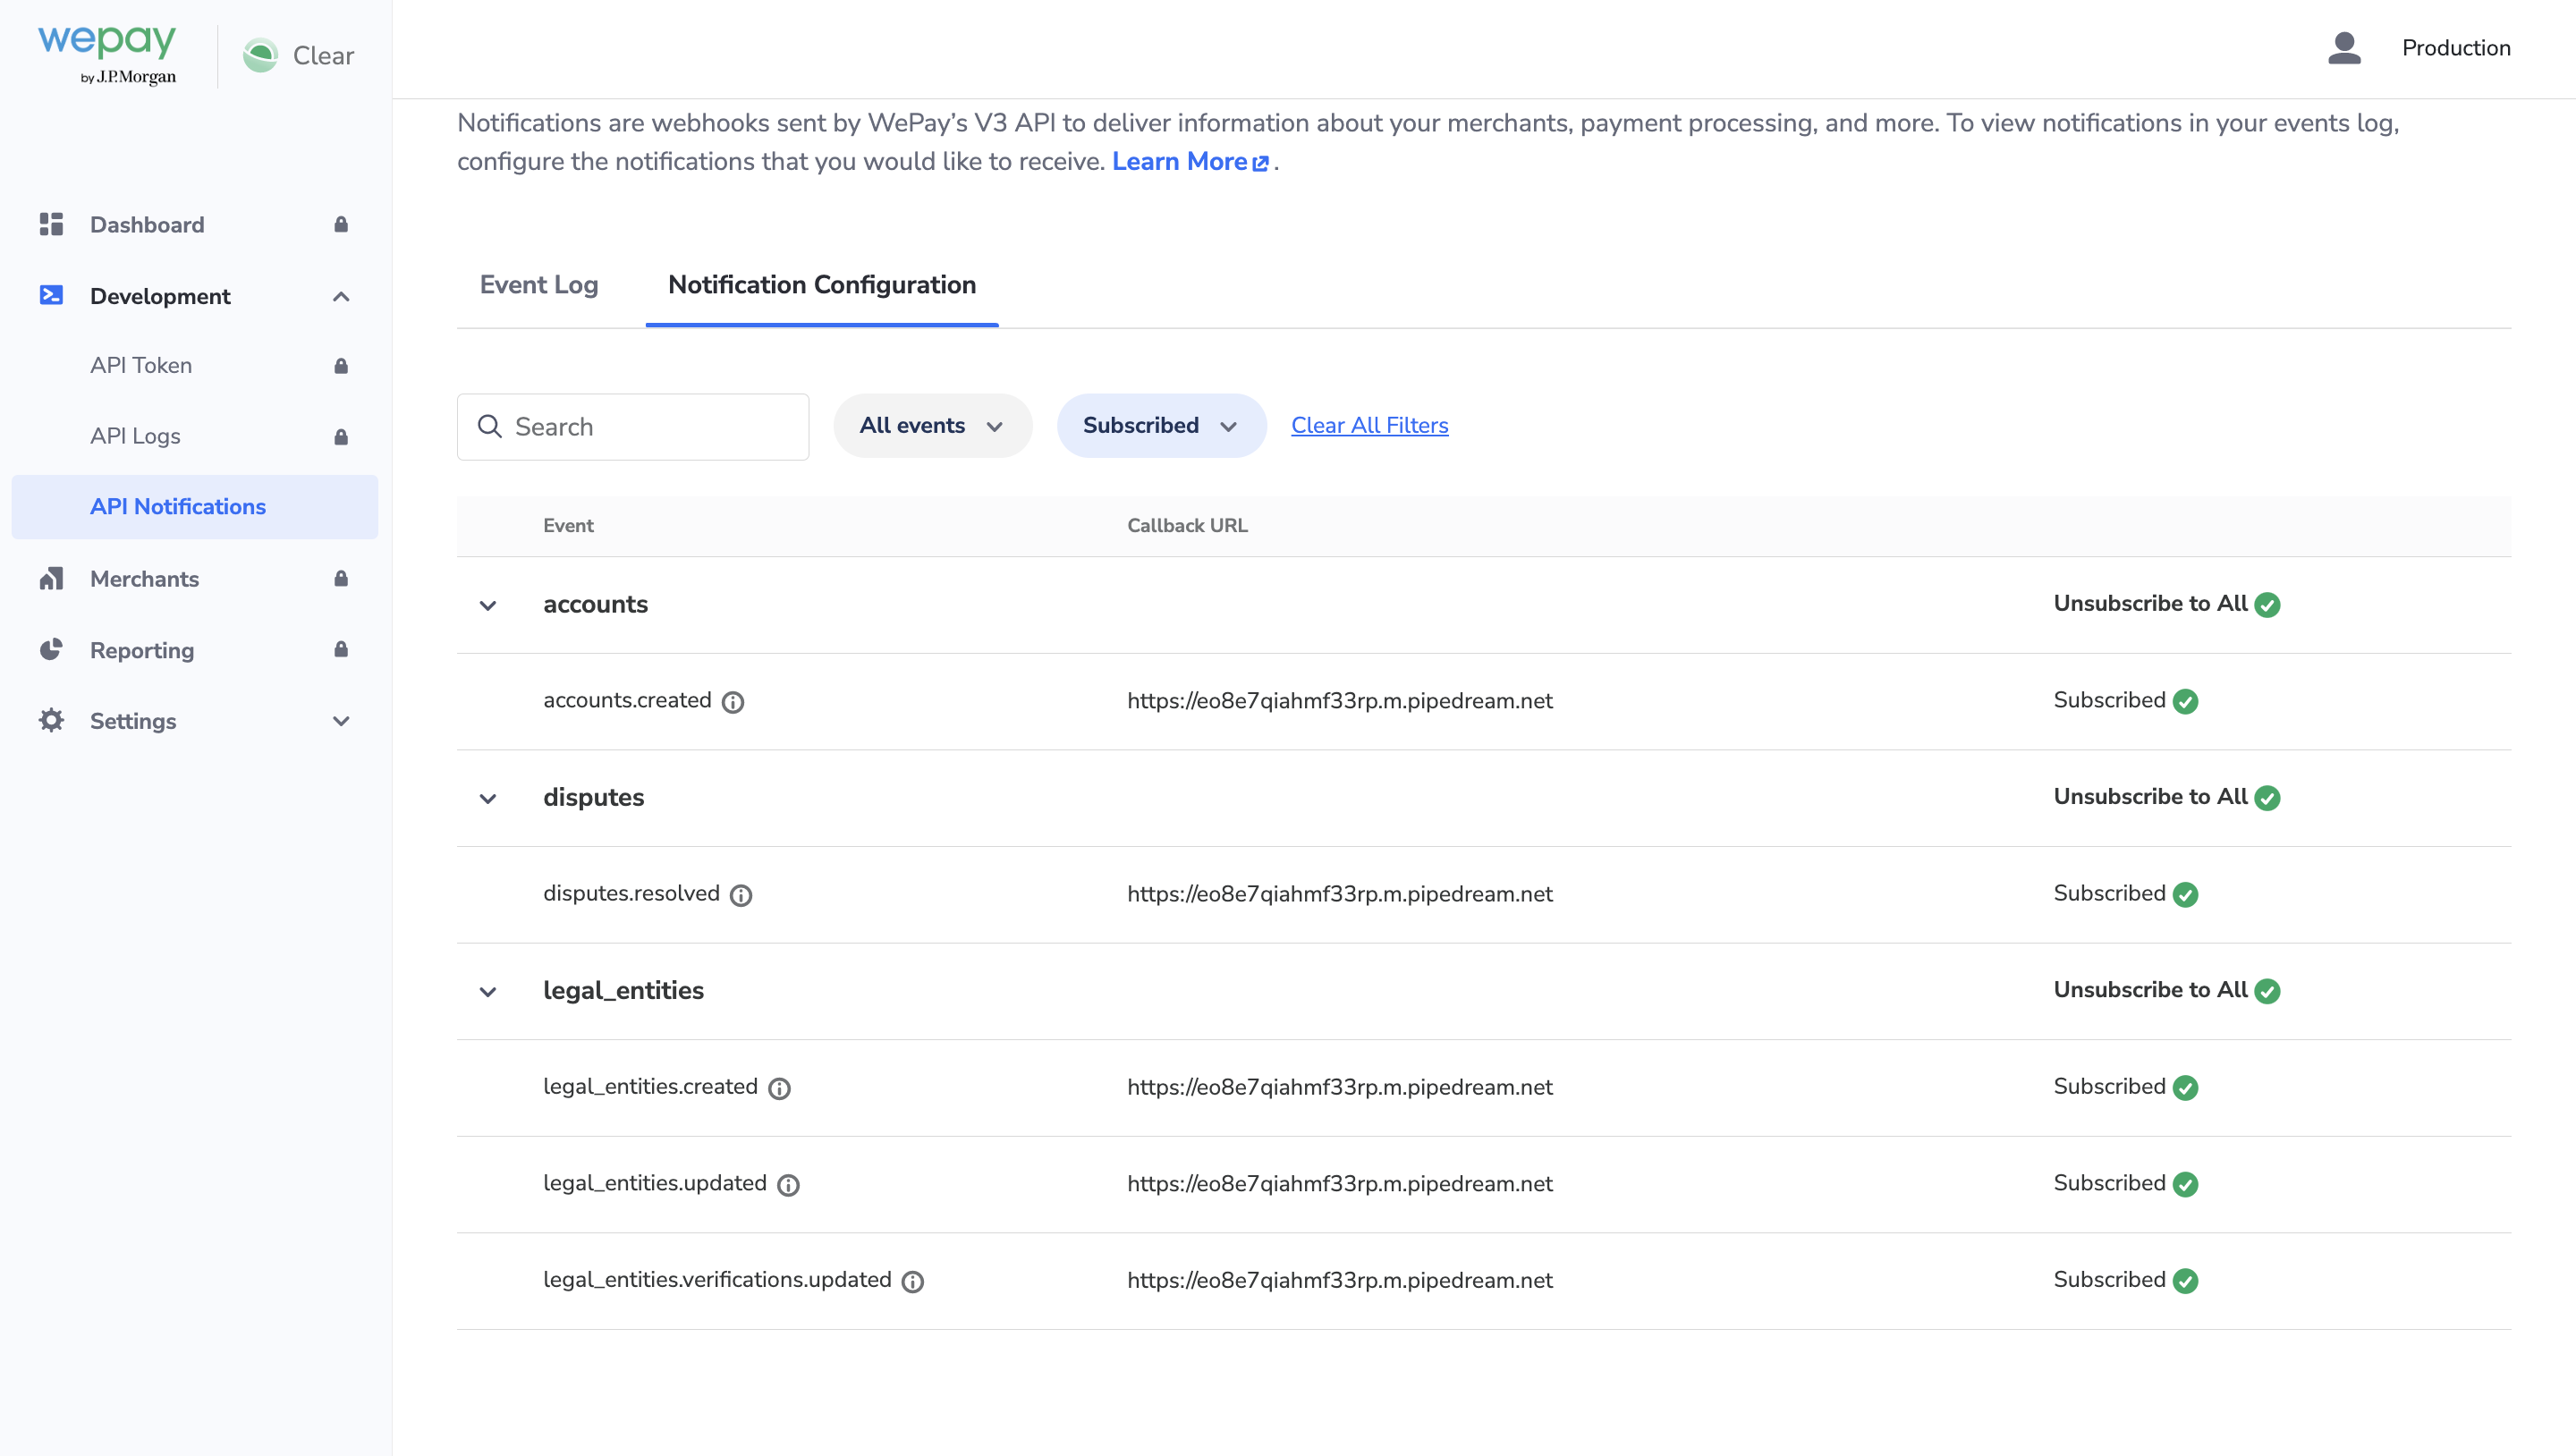
On the Notification Configuration page, the partner will see two tables. The first table is the Recommended Topics table and the second table is the All Topics table. These tables will have a list of different notification topics that a user can select.
The user will click the "Subscribe" checkbox. The notification configuration window will then open.
- The pop up will show in bold the notification(s) the partner will be subscribing to.
- The partner will have to enter in a valid Callback URL.
- The radio button for the API Version will automatically be filled in for V3.
- Once the partner is ready, the partner will be able to click "Save" to save their notification preference.
The pop up will close and when the user looks back at the topic "accounts.created" in the table, the partner will see that the checkbox now indicates they are subscribed to "accounts.created."
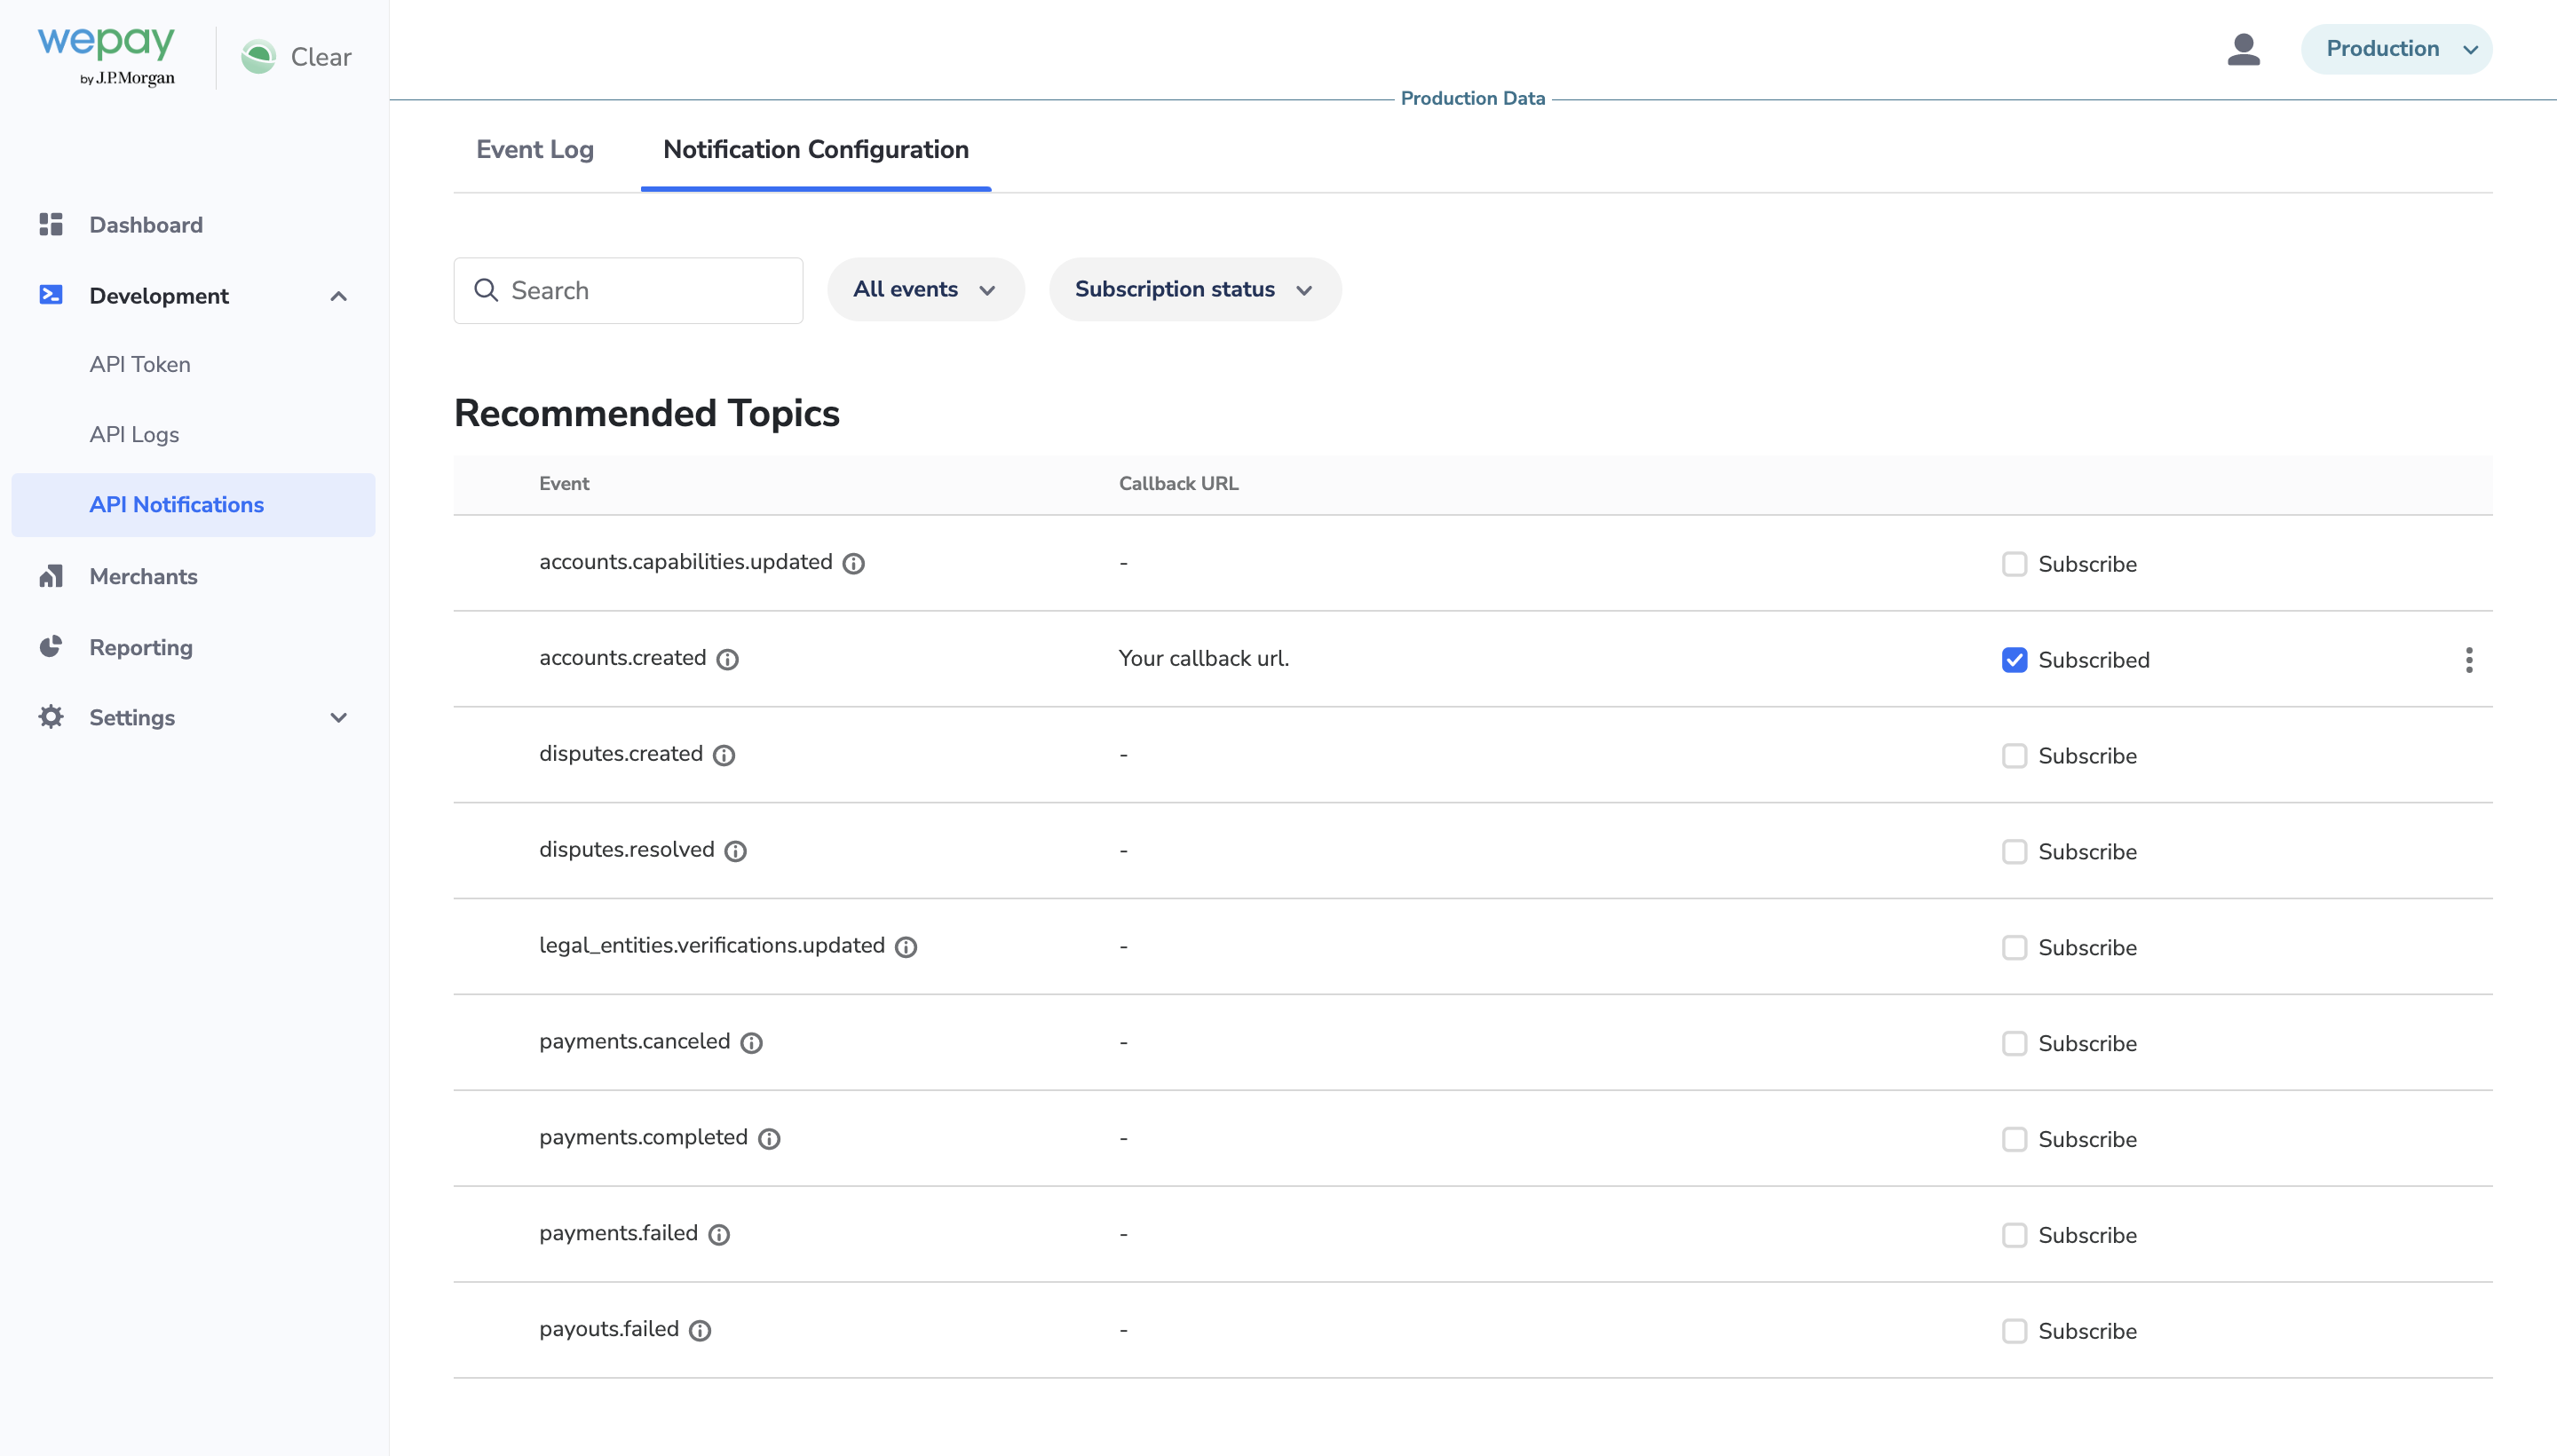
Users with "Read/Write" access will see all of the notifications they subscribed to marked with a checkbox.
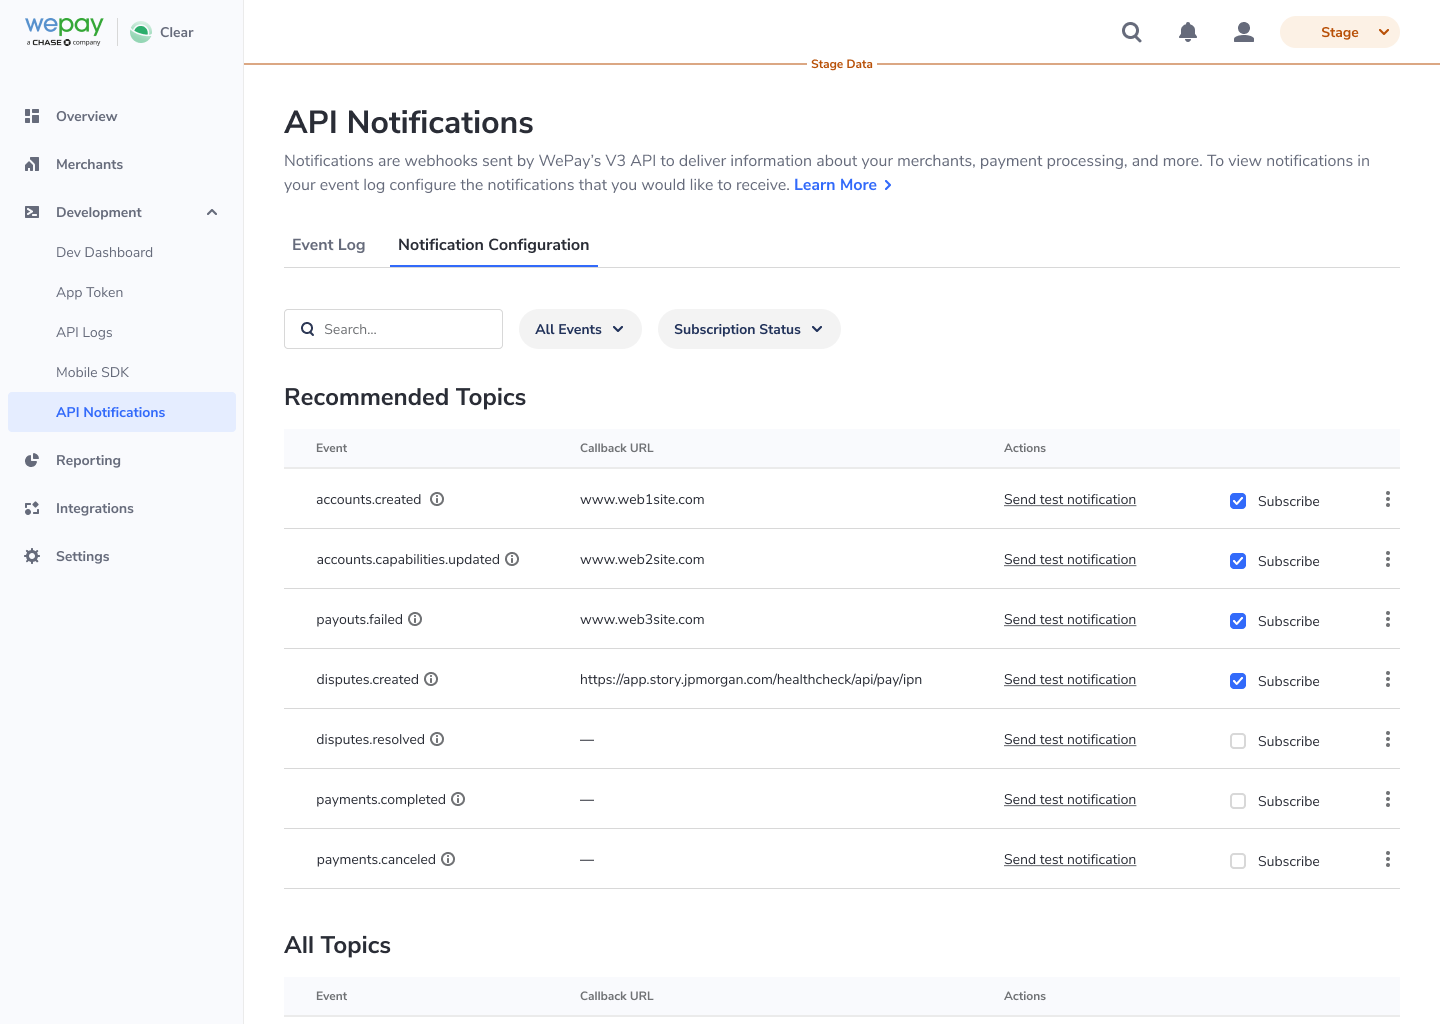
You can filter by:
- Subscription Status: "Subscribed", "Not Subscribed"
- All Events: topic categories, such as "accounts," "adjustments," "billing_statements", "legal_entities," etc.
- Search: search by topic category or a specific topic (ex: legal_entities.verifications.updated)
What do users with "Read" access see on the Event Configuration tab?
Users with "Read" permission are unable to edit the notification configuration. These users will only be able to view what notifications their Partner Center is subscribed to.
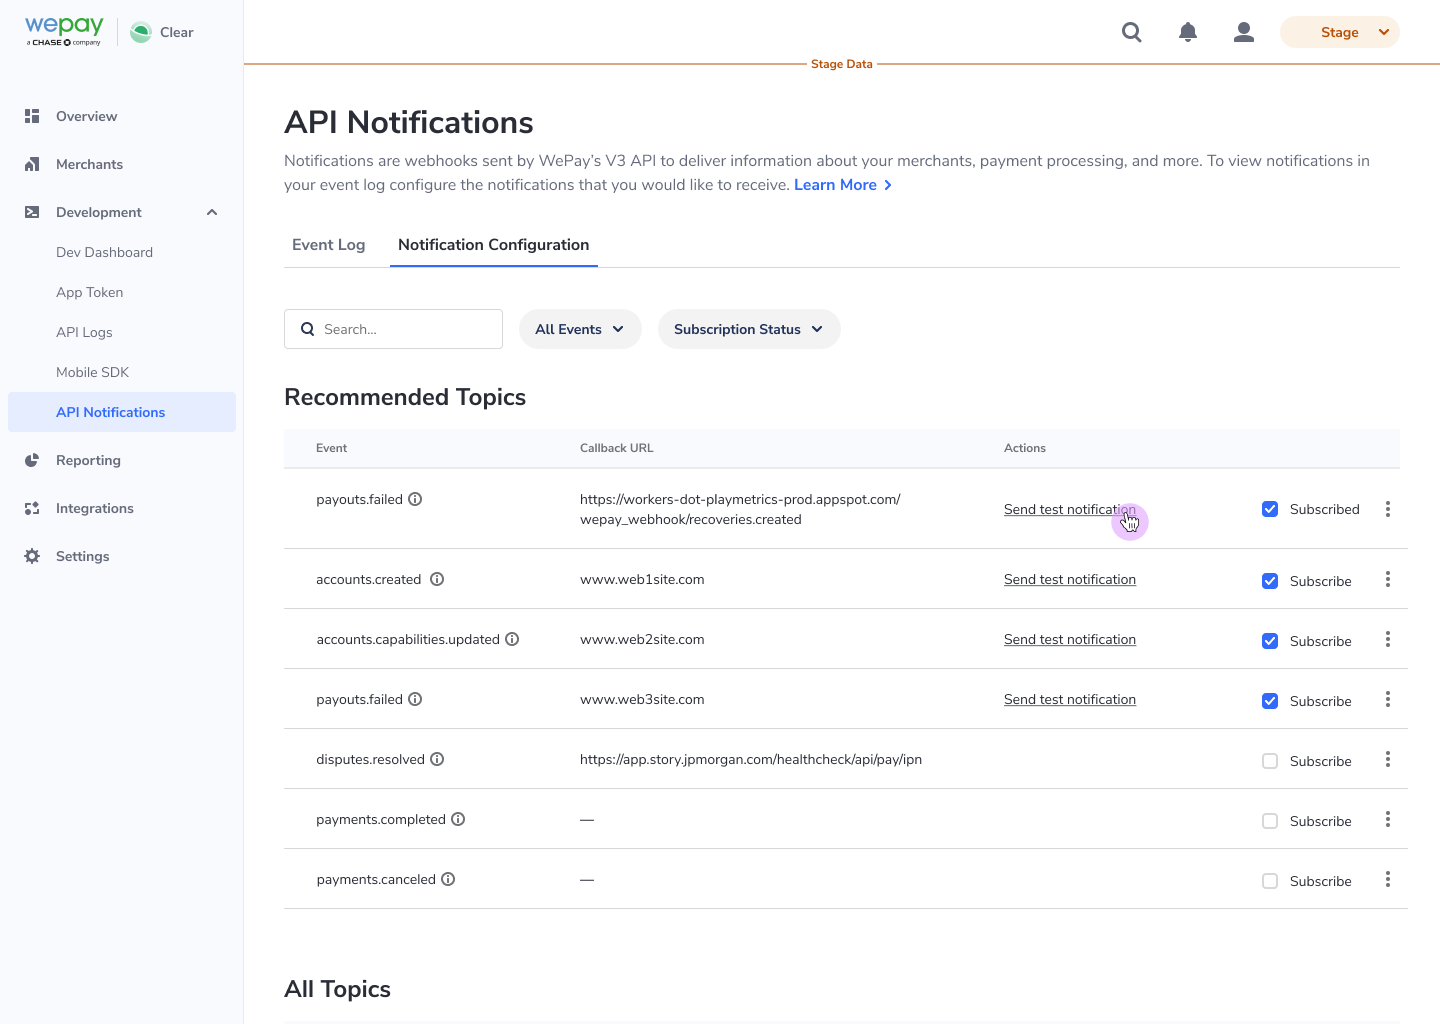
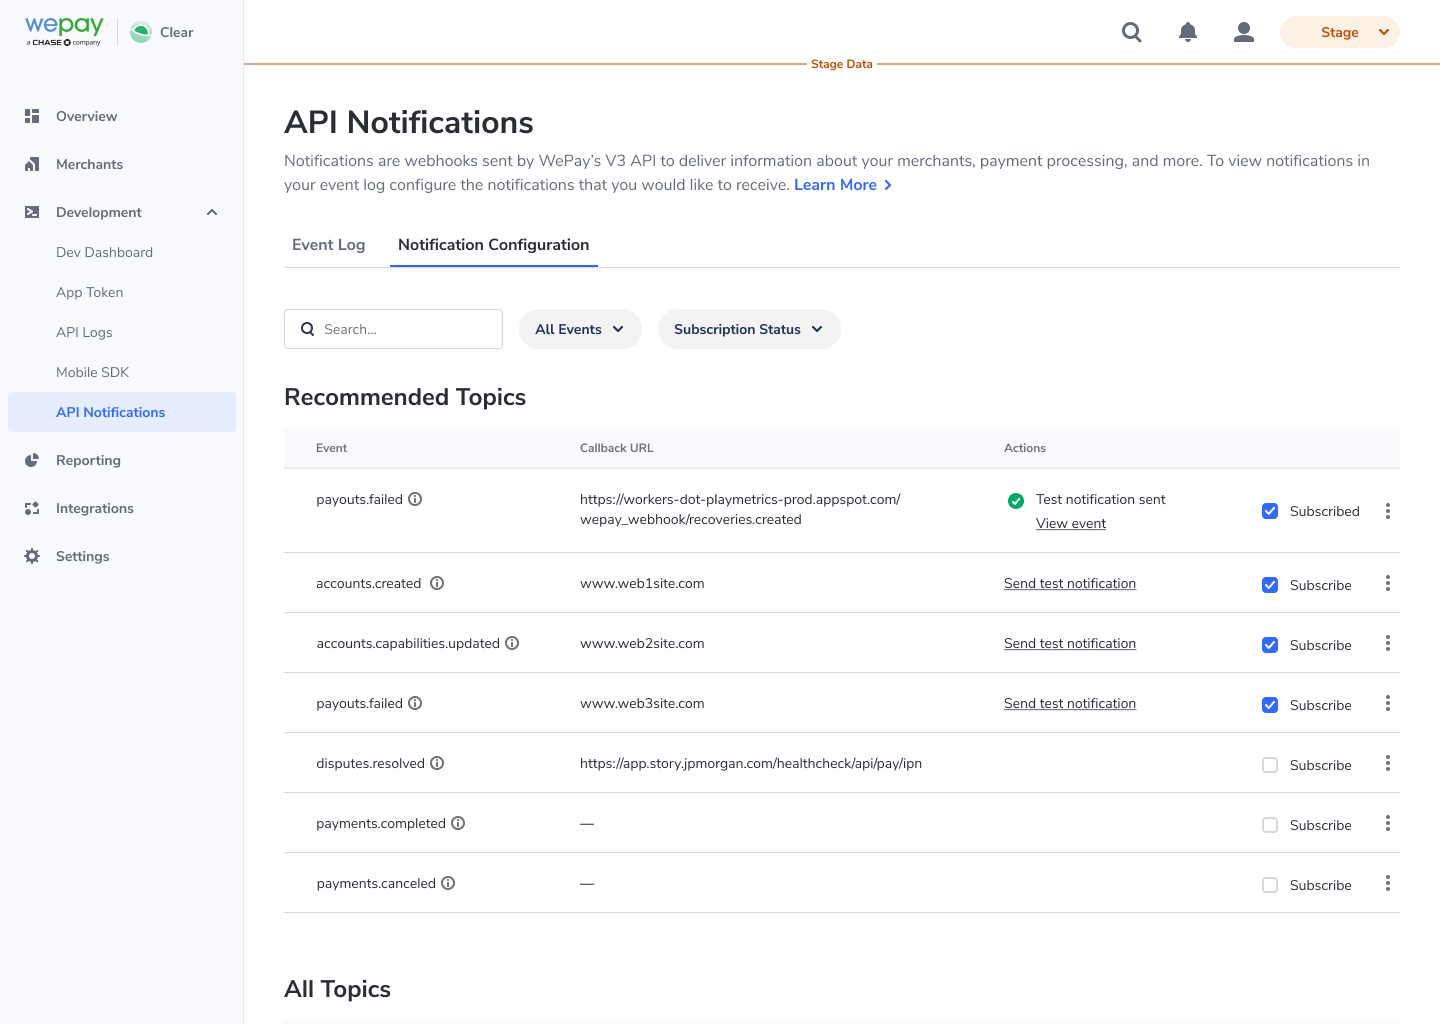
What is the difference between the stage and production Notification Configuration page?
The main difference is that in stage partners are able to send out a test notification. On production, partners do not have the ability to send out a test notification.
What information is on the Event Log?
- The event log will show a list of all of the notifications the partner has received.
- Partners can click into a specific log to view additional information, such as the raw JSON data aka payload.
- The furthest in time the notifications will be able to go is the last 60 days.
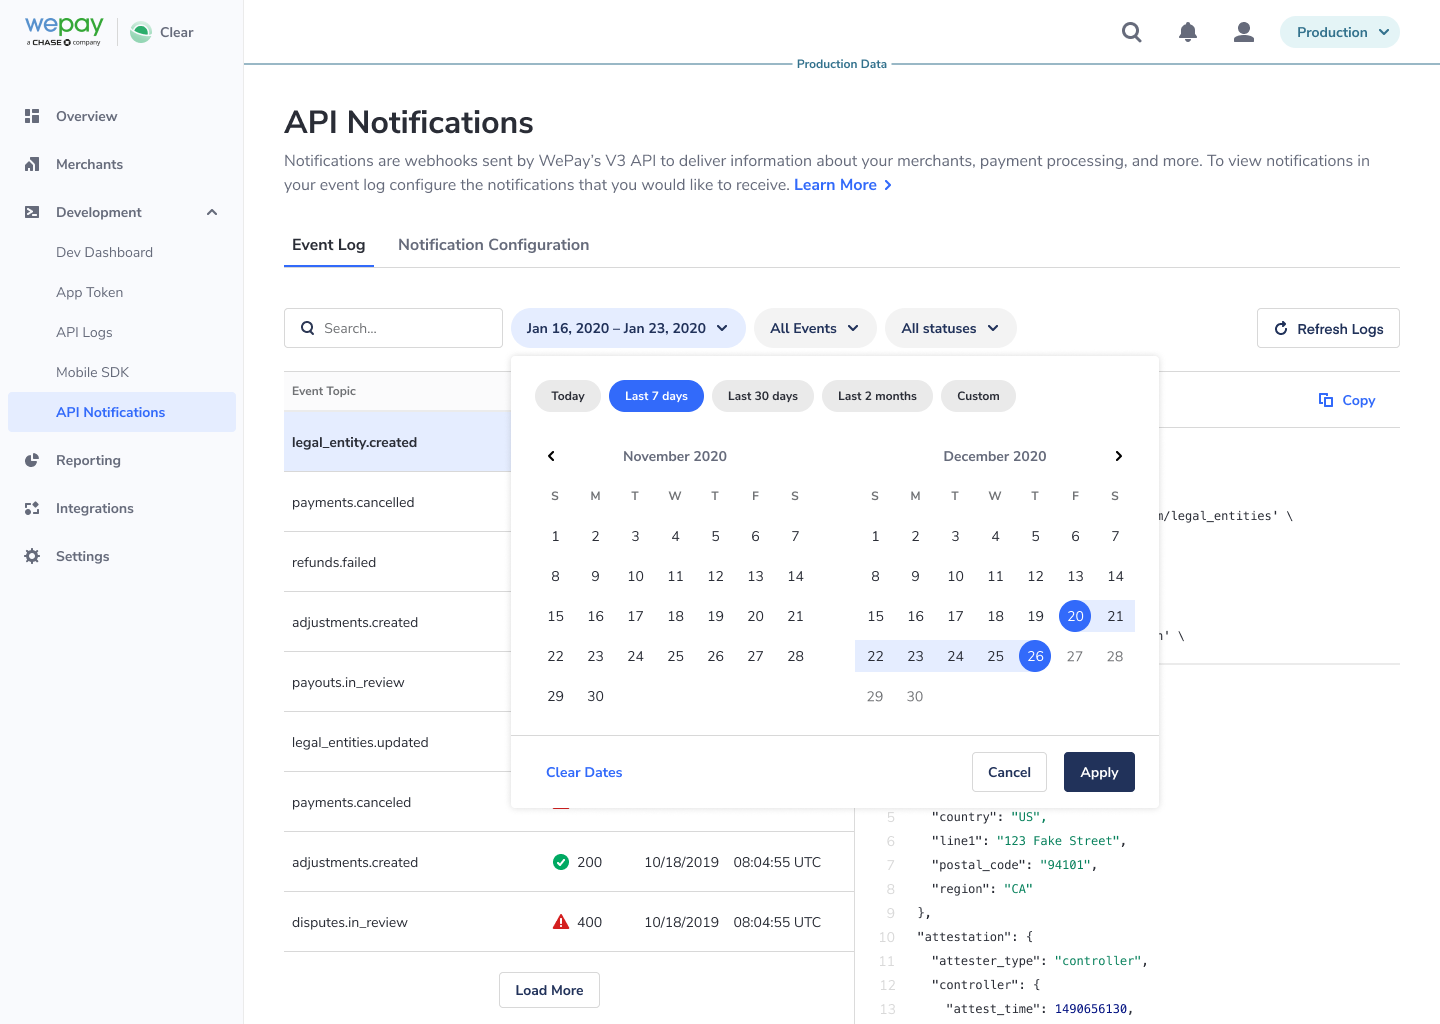
Filters
- Date: default view is 60 days, view last 30 days, view last 7 days, view Today, Custom date
- All Events: Finds notifications that fall under a specific topic category (ex: accounts, refunds, legal_entities)
- Statuses: Finds notifications in the log that have a specific status (Successful, Failed, Retrying)
- Search: Search by topic name to find notifications or notification payloads with that keyword in it. Search by notification ID.
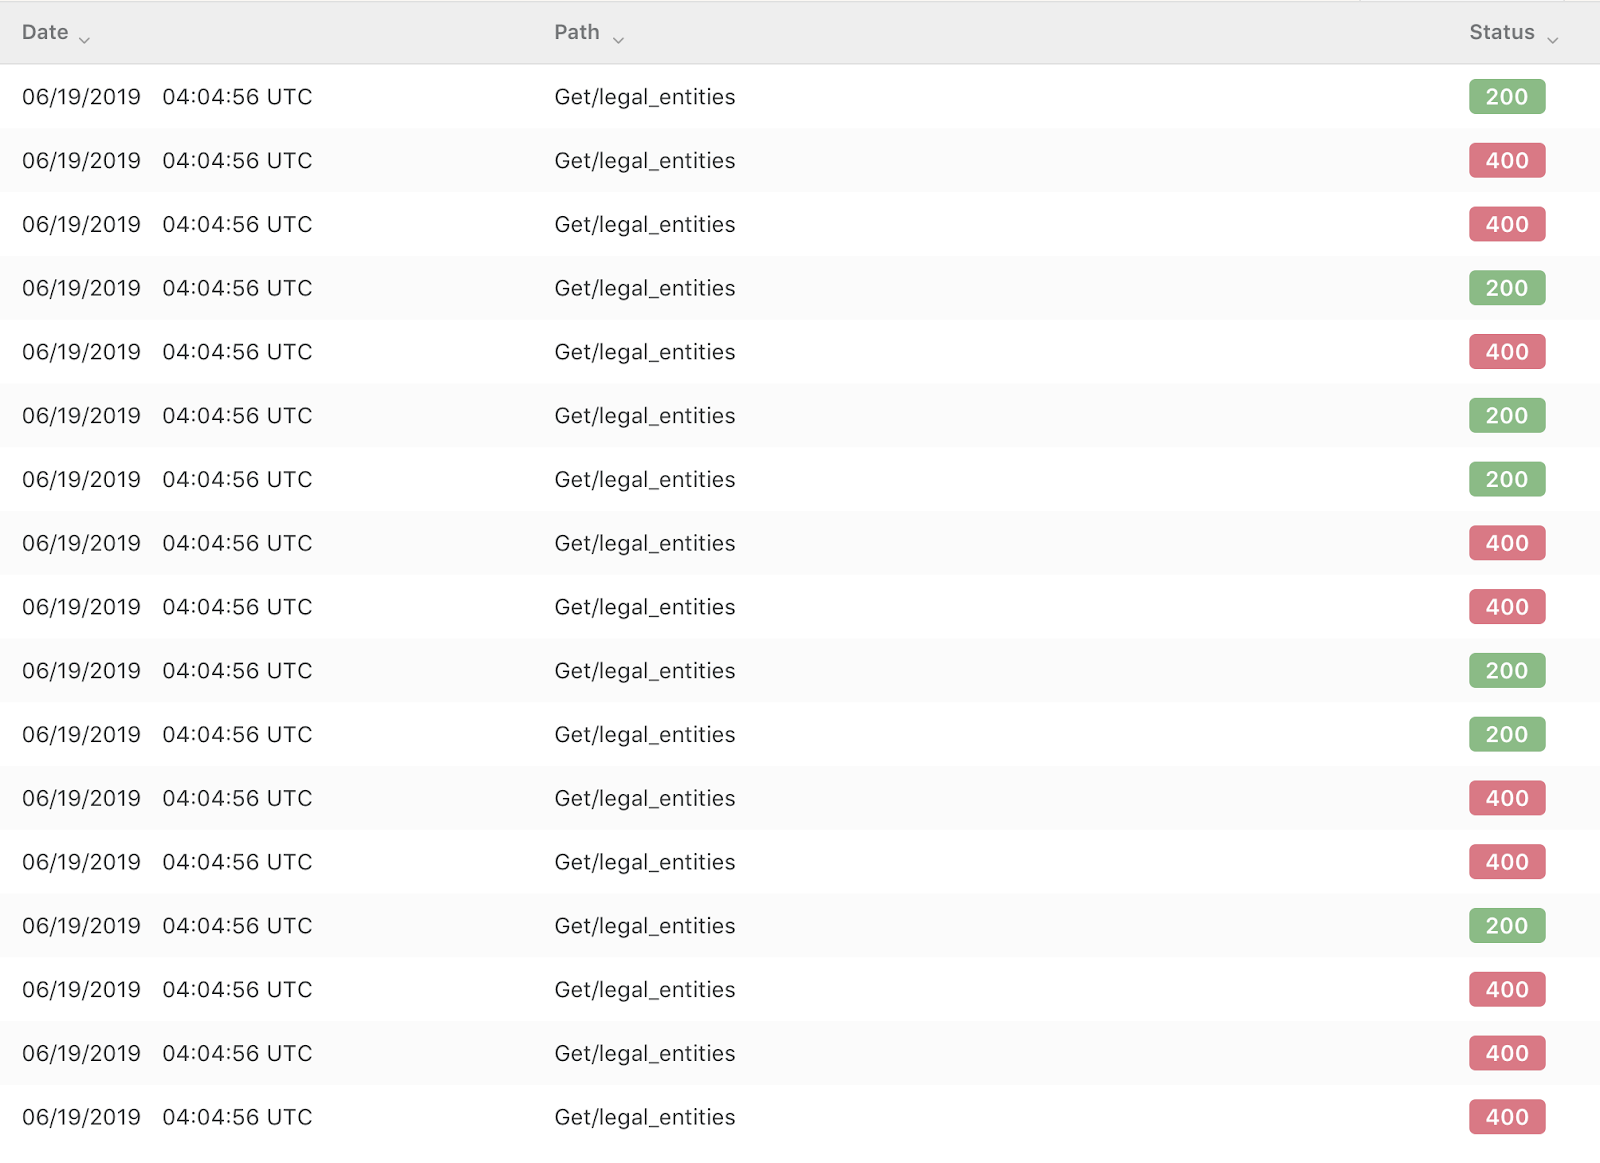
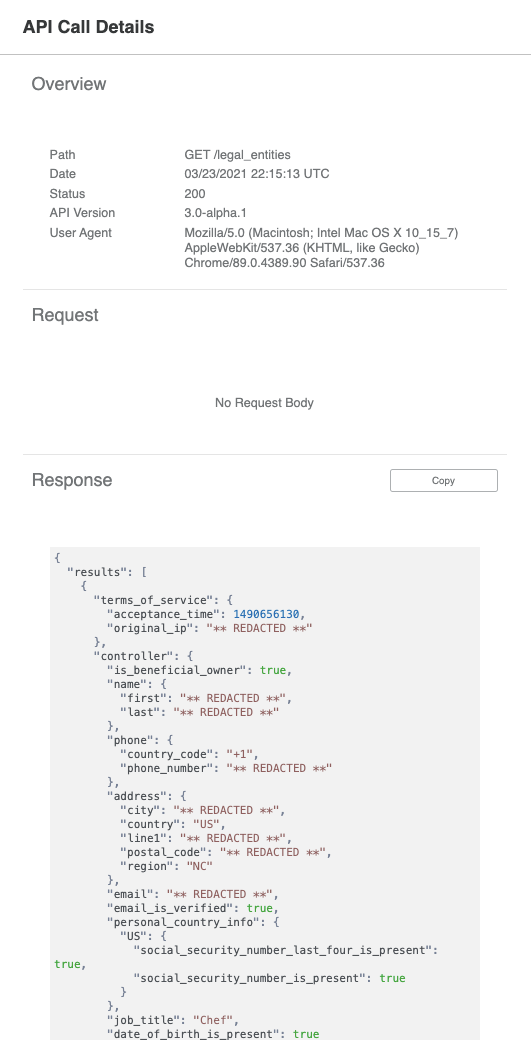
View API Logs
Under the Development tab, view stage and production API Logs in the Partner Center. Users can filter on date, path (v2 and v3), keyword, HTTP method, and Response Status. Selecting a specific API call will expose the request and response headers, query parameters, and JSON body. All PCI and PII are redacted from the API parameters and response.Filter API Logs

View API Logs Body
View API Call Details
Merchant Profile
Navigate to a merchants' profile by clicking on a row in the "Merchants" tab.
Payouts
View a merchant's payouts in the "Payouts" section of the "Merchants" tab.

Account Status
The Account Status tab on merchant profiles allow you to view a merchant's:- KYC Status (V3 offering only)
- Documents Required for Legal Entity verifications (V3 offering only)
- Upcoming Issues (V3 offering only)
- Current Issues (V2 and V3 offering)
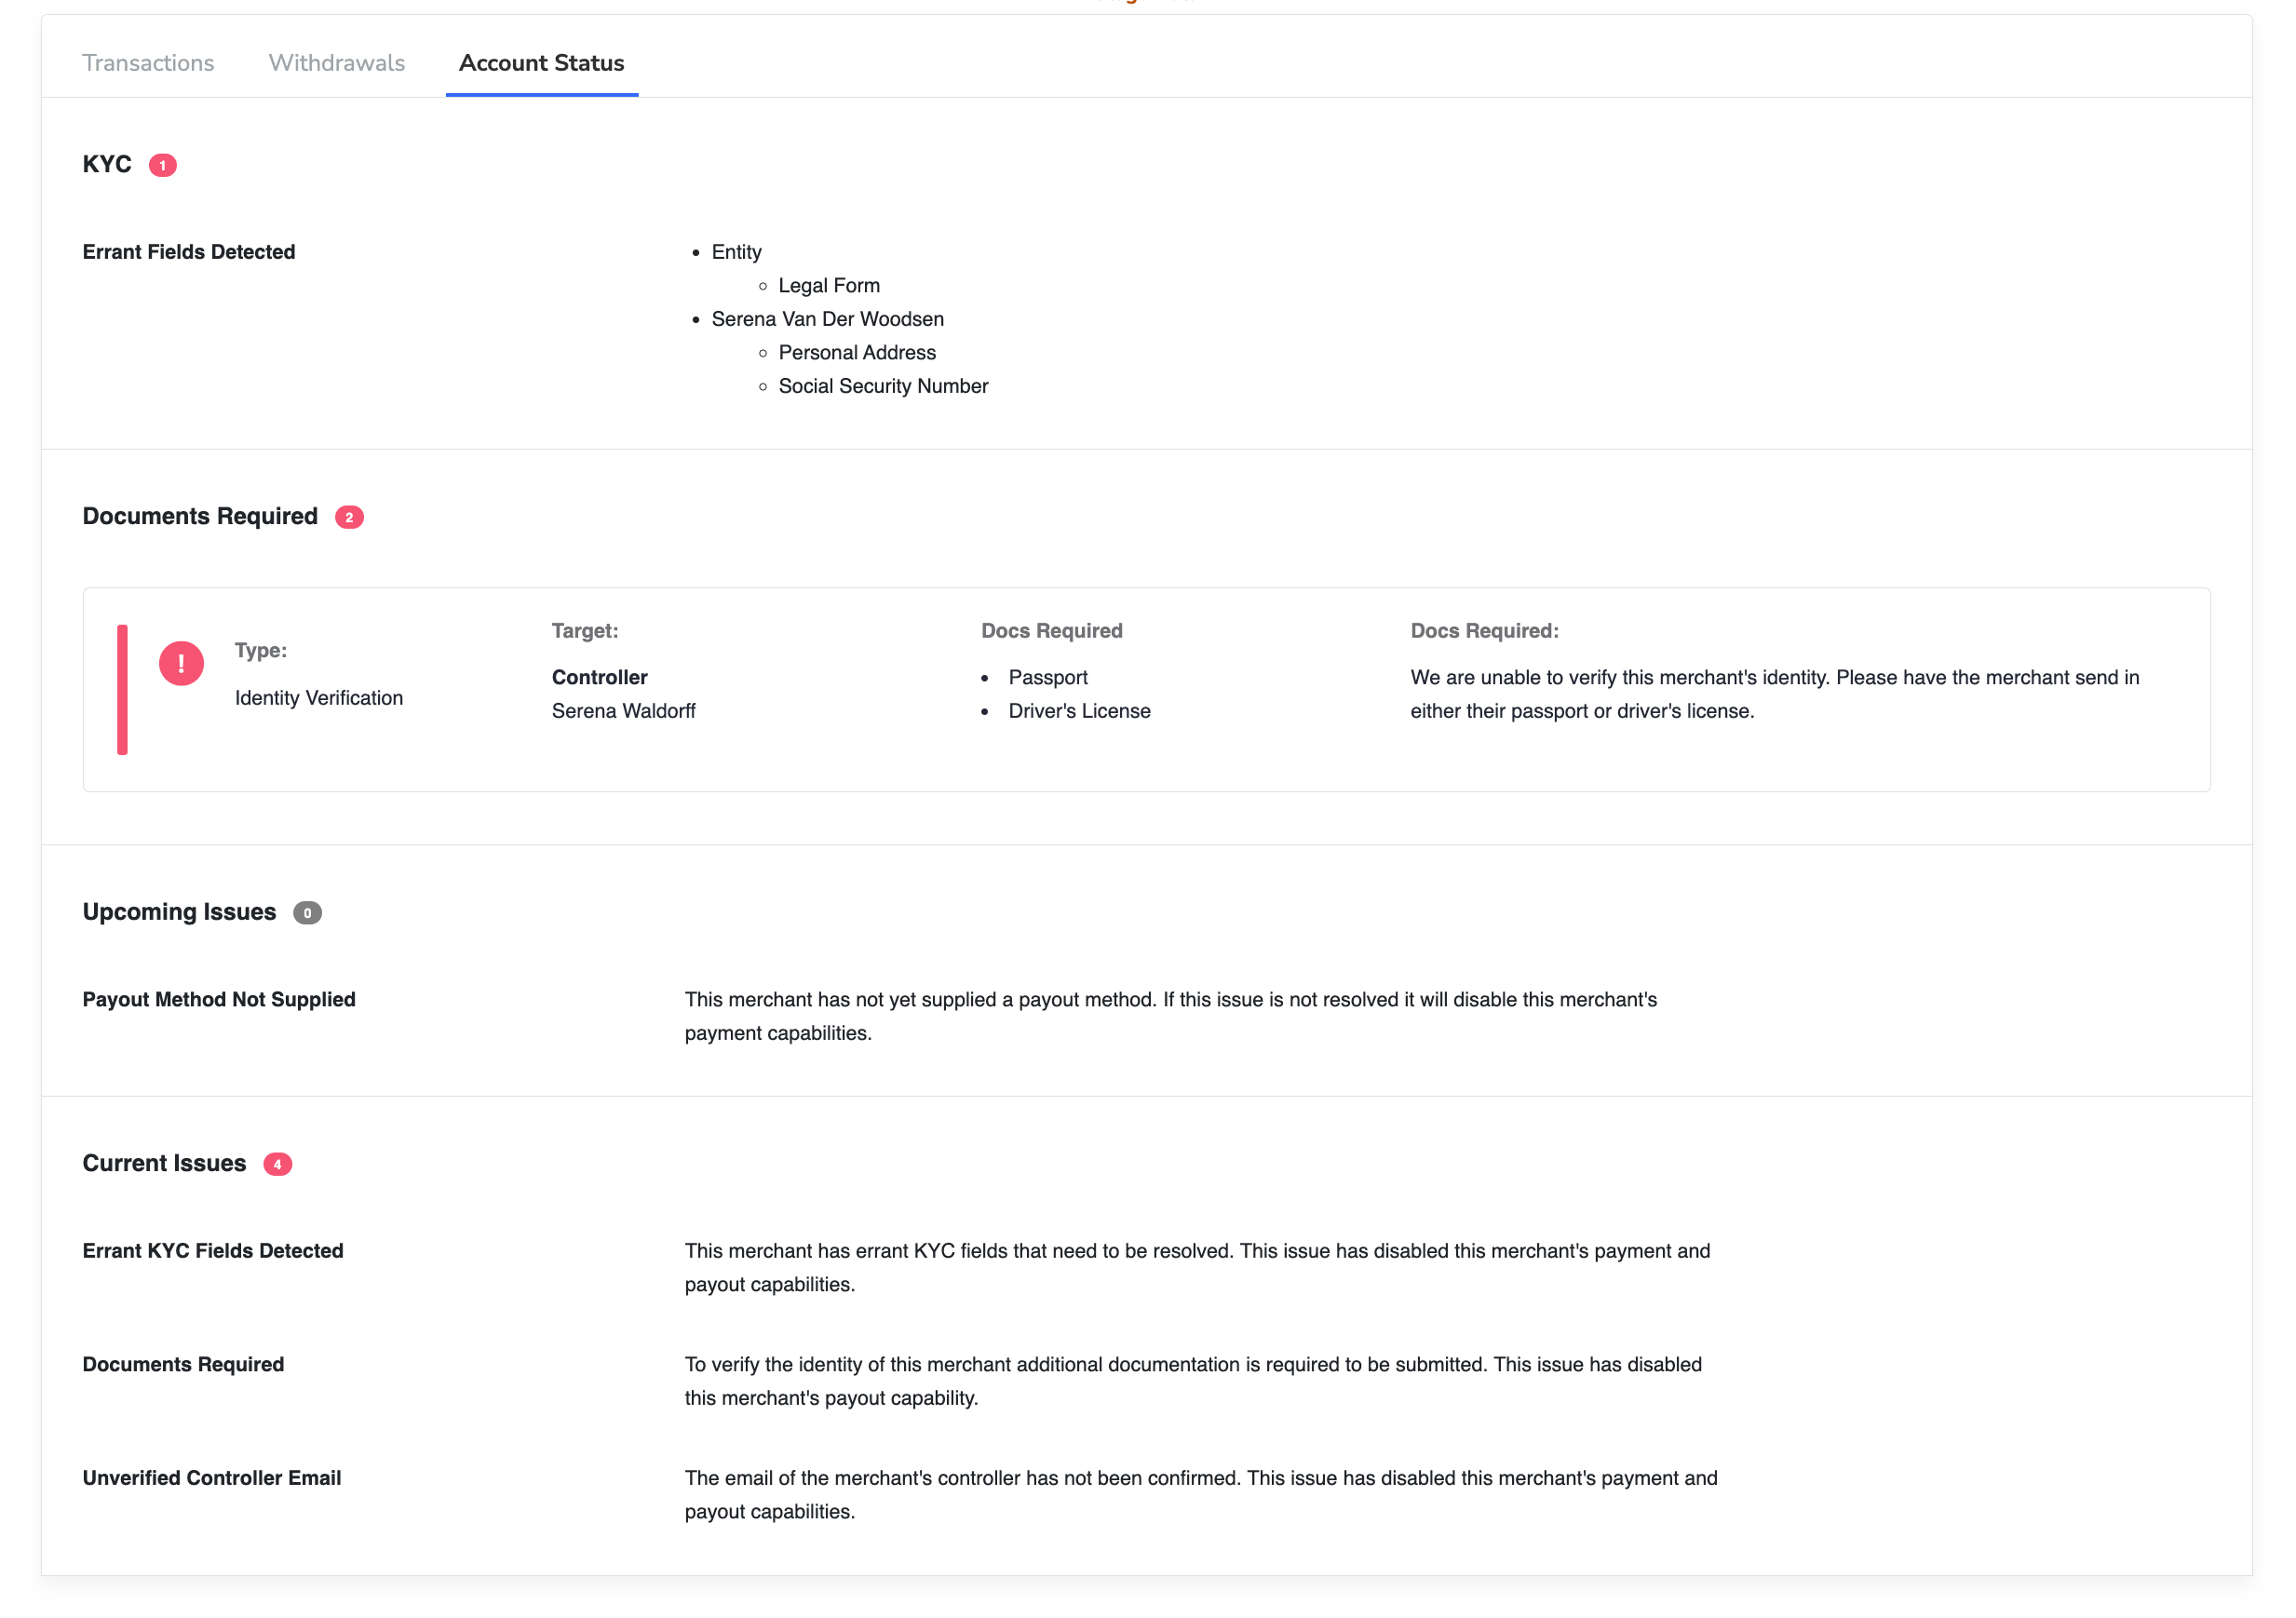
For merchants onboarded via the WePay Merchant Center or KYC iFrame, this section will show if KYC has been submitted or not, and any fields that may need to be corrected. For merchants onboarded via you own custom KYC flow, this section will outline any errant fields. This information can also be viewed via the API using the
GET /accounts/{id}/capabilities endpoint.Documents RequiredFor all merchants, this section will identify any supporting documents that we require to verify the merchant. Note that this section relies on the newer identity_verification structure to identify the specific person/entity which must submit a specific document, so be sure to work with your WePay integration team, technical account manager, or API support to get this preferred method enabled for your app.If you are a permissioned Clear partner and have not updated
identity_verification to be your app's default, then a generic message indicating that some documentation is required will appear. Our support team must then be engaged in order to get more specific information on what is required.Upcoming IssuesUpcoming Issues lists out issues that, if not addressed, will move over to the Current Issues section. It is important for the merchant to address these issues because once they become a current issue they will affect payment and payout capabilities.Current IssuesCurrent Issues will list out issues that are currently affecting your merchant's account in terms of the payments and/or payouts capabilities. The listed issues will have first a high level issue title, and then a generic issue description.Note
payments or payouts parameter in the GET /accounts/{id}/capabilities documentation.For V2 partners: To review the full list of possible current issue types, see the GET /account documentation.
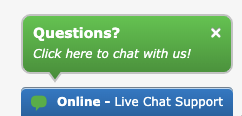
Use Partner Chat
Use the Partner Chat function to chat with live WePay Agents online Monday through Friday from 6 AM - 6 PM Pacific Standard Time.