 Core
Core Link
LinkExplore Merchant Center
The WePay Merchant Center is hosted by us and includes the following features for merchants.
BETA
The revised Merchant Center is currently available to all new merchants. Work with your WePay team to migrate your existing merchants.
Customize Branding
Customized branding can be accomplished via the Partner Center. Find more information here.

Onboard
Merchants who onboard to the WePay Merchant Center will complete onboarding tasks there.
Note
When you onboard a merchant, any merchant information you send to our API will be automatically filled in the merchant's KYC. This allows the merchant to move through the form without providing redundant information.
Note that SSN and Date of Birth cannot be pre-filled due to security reasons.
Resolve Errant Fields
Note
This feature is temporarily unavailable as we resolve a bug. For the time being, any KYC resets will prompt the merchant to go through full KYC entry. We apologize for any inconvenience.
During onboarding, we may determine that one or more KYC values submitted by a merchant were incorrect and consequently clear out the value(s). Merchants who are required to re-enter errant KYC information will be prompted with an option to do so in the Merchant Center. The errant fields will be highlighted for the merchant, and all other KYC fields will be non-editable.

Verify KYC
During onboarding, we may require supporting documentation to verify a merchant. When this happens, merchants will receive an email and will see a banner when they log in to the Merchant Center.

When the merchant clicks the banner, the document upload screen will load. This page will provide guidance to the merchant regarding what kind of documents to provide.

Merchants can return to the support tab of the Merchant Center to check the status of the documents they uploaded.
Manage Settings
Modify Public Information
Merchants have the ability to change the Business Name and Contact Number that appears on the payer's card/bank statements. The first time a merchant accesses the Merchant Center, a modal will load showing the merchant how to change these details from the Public Information section of their settings tab.

The modal will then allow the merchant to modify the information that will show up on their payer's statements.

Merchants can always navigate back to the settings tab of Merchant Center to update this information.

Update Settlement Options
Merchants can change their settlement bank account and funding period from the Settlement Options section of the settings tab in Merchant Center.
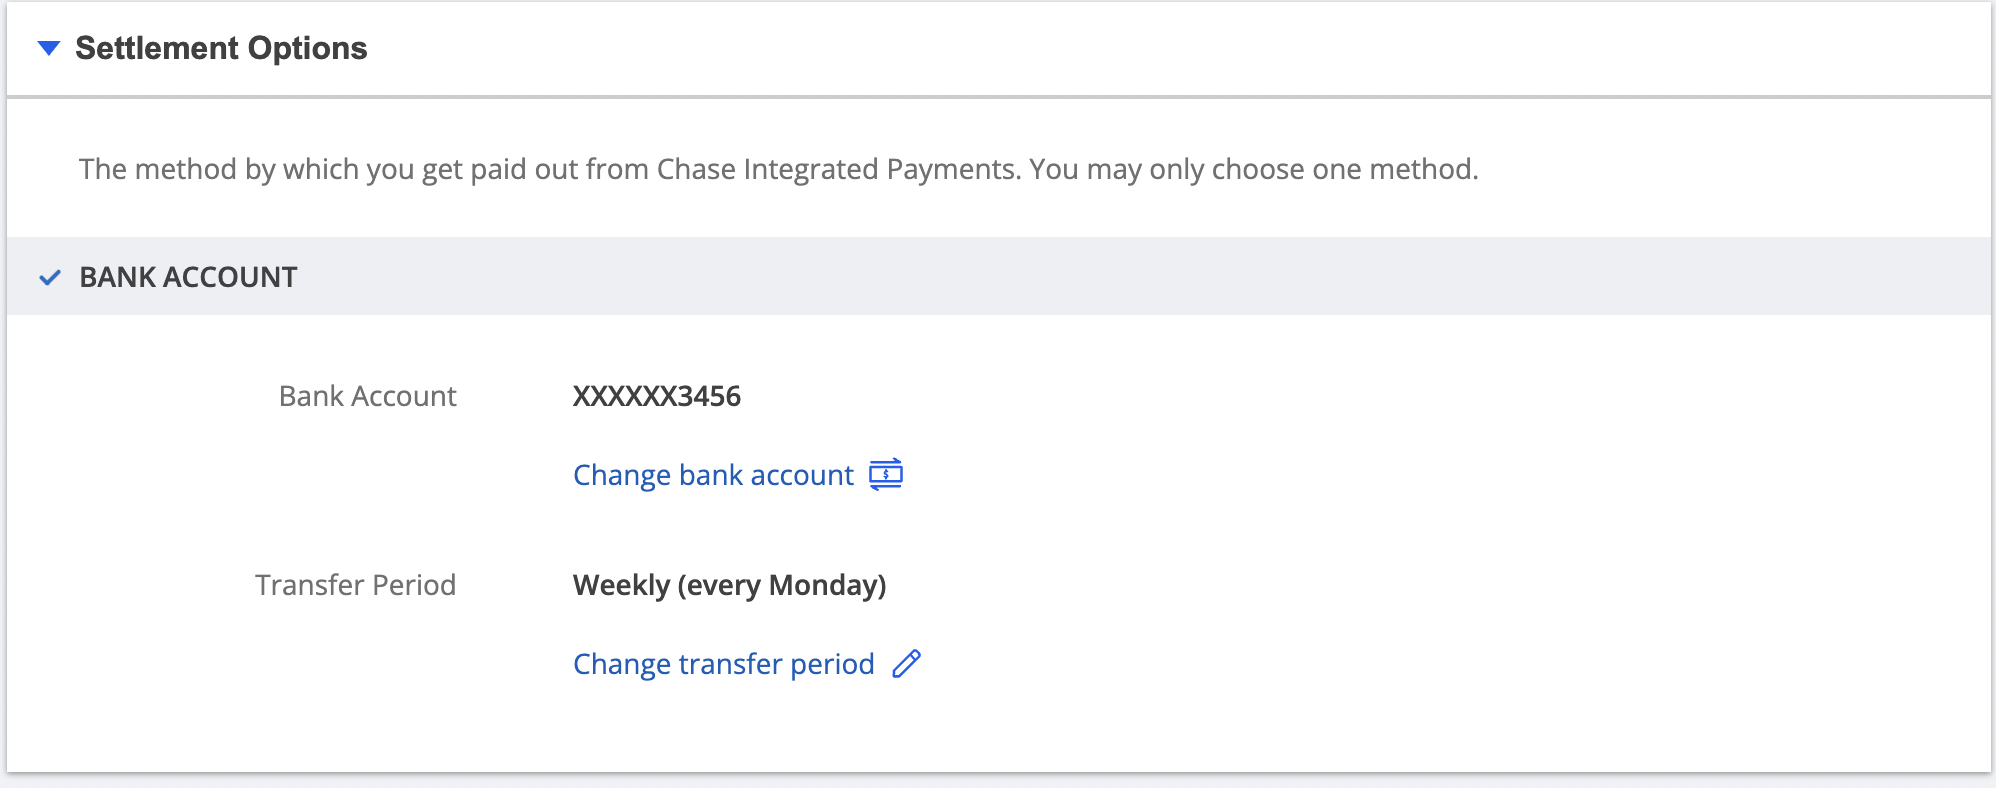
By clicking the edit button, the merchant will be able to add details for a new settlement bank.

Access Reporting
All reporting is available from the landing page of the WePay Merchant Center. Reporting features include:
- Metrics
- Activity Table

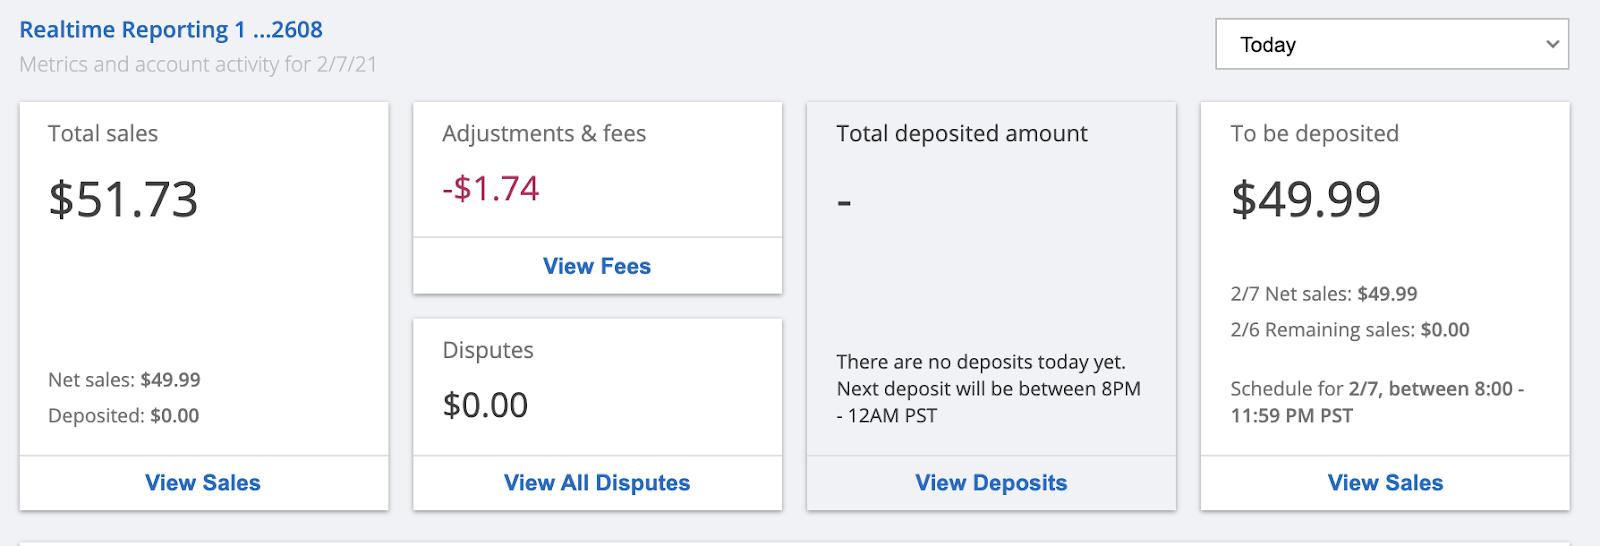
View Metrics
There are 4 time periods available for selection - Today, Yesterday, Last 7 Days, and Last 30 Days and each metric shows the total for the activity in that selected time period. Default time period - Today.
The following metrics are available across time periods:
- All Transactions
- Total Sales
- Calculated as
(Gross of Sales) - (Refunds)in the selected time period
- Calculated as
- Adjustments and Fees
- Calculated as
Total of any adjustments and feesin the selected time period
- Calculated as
- Disputes
- Calculated as
Gross total of disputed salesin the selected time period
- Calculated as
- Deposited
- Calculated as
Total of depositsin the selected time period
- Calculated as
- To Be Deposited
- Tentative amount that merchant can expect to get in the next deposit
- It is independent of time period selected
- Provides break up of how the total is formed from activity of previous day after cut-off and activity of today before cut-off
View Activity Table
By default, the activity table below the merchant's metrics will display all account activity, ordered by date newest to oldest. Merchants can get other reporting and reconciliation information on the Activity Table by selecting the type of report they would like to see:

For instance, all of a merchant's activity may look something like this:

View Card Present Activity By Device
Merchants who process Card Present transactions will be able to find device information per transaction.

Likewise, merchants can filter their activity log by Card Present device.

View Merchant IC+ Billing Statements
Merchants who are on Merchant IC+ pricing can get their monthly billing statements from the Merchant Center by filtering the activity type.

From there, merchants can see that statement's break down of each card network's fees.

Report A Problem
Merchants have the ability to report a problem with a given transaction from the Activity table. Work with your WePay integration team to configure the inbox where the form will send reports.

The Report A Problem pop up will then allow the merchant to describe the problem with the transaction and provide any documentation on the issue.

Once submitted, a confirmation pop up will let the merchant know that their report has been submitted, confirm the merchant's email address on file that support will follow up with, and notify the merchant of support's response service-level agreement.
Manage Disputes
All new disputes will be shown with a red exclamation mark prompting the merchant to take action. The status will be set to “Open - Awaiting your response.”

Clicking into a dispute will provide more information about that dispute. Below the dispute information will be two buttons to either Concede or Challenge the dispute.

If a merchant would like to challenge the dispute, they will click the “Challenge” button. The resulting pop up will explain what a dispute is, as well as the different forms of documentation they can provide in order for us to fight the dispute on their behalf. The merchant will also be able to provide context on what the payment was for, as well as an explanation as to why they would like to challenge the dispute.

After challenging a dispute, the status will change to “Pending - Awaiting Support Review.” There will also be a message shown saying “It will take between 5-10 business days from Contested on date for the full review to be complete. Please wait until then to contact support regarding this Dispute.”
Issue Refunds
Note
Any ACH refunds requested within 7 days of being captured will be denied and the user will receive an error message.
If a merchant would like to refund a payment, they can click on the transaction. Underneath the payment information will be an “Issue Refund” button that the merchant can select to initiate the refund.

The merchant will then be prompted to enter a refund amount, refund reason, and to add more details. The refund amount is the only required field, and it allows the merchant to make partial refunds if necessary. For full refunds, the merchant should enter the entire amount available for refund, as indicated at the top of the form.

The merchant will then select the “Issue Refund” button. Note that once a refund has begun to process it cannot be reversed.
The refund will then be initiated. If the merchant needs to refund more, they can select "Refund More," and enter a new amount.

The merchant can then view the transaction history, including all refunds.
